Adding Data In MySQL Workbench
In the previous section, you created a model, schema, and table. You also forward engineered your model to the live MySQL server. This section uses MySQL Workbench to add data into your MySQL database.
Open a MySQL connection.

- From the Navigator panel on the left, select the
moviestable from thedvd_collectionschema that we created earlier in this tutorial. Right-click on themoviestable and choose from the context menu.NoteThe Navigator panel has both Management andSchemas tabs. - This displays the query and its associated results grid. The table is empty, and data may be added into the results grid.NoteThe
movie_idcolumn is set toAUTO_INCREMENT, so values are not needed for this column.Input the following data into the movies table:title release_date Gone with the Wind 1939-04-17 The Hound of the Baskervilles 1939-03-31 The Matrix 1999-06-11 Above the Law 1988-04-08 Iron Man 2 2010-05-07 NoteDo not modifymovie_idcolumn values. - Click to apply these changes to the live MySQL server.
- View the data grid again and observe the generated
AUTO_INCREMENTvalues. - Optionally, you might confirm the changes by checking an external source, such as the MySQL Command Line Client. To check, enter
SELECT * FROM movies;from the MySQL Command Line Client to confirm that the data was entered. - You can also use MySQL Workbench to perform a similar check. Close the
MyFirstConnectiontab (or MySQL Workbench) and then open theMyFirstConnectionconnection from the home page. ExecuteUSE dvd_collection; SELECT * FROM movies;to display the newly entered data.


In this section of the tutorial, you have learned how to add data to your database, and also how to execute SQL statements using MySQL Workbench.
For additional information about the SQL editor, see Section 8.1, “Visual SQL Editor”.
The MySQL Table Editor
The Main Editor Window
Any number of tables may be edited in the MySQL Table Editor at any one time. Adding another table creates a new tab at the top of the editor. By default, the MySQL Table Editor appears docked at the top of the table editor tab, within the SQL editor..
The MySQL Table Editor is shown on top of the following figure.
The MySQL Table Editor provides a work space that has tabs used to perform these actions:
-
Columns: Add or modify columns
-
Indexes: Add or modify indexes
-
Foreign Keys: Add or modify foreign keys
-
Triggers: Add or modify triggers
-
Partitioning: Manage partitioning
-
Options: Add or modify other options, divided in categories named general, row, storage, and merge
-
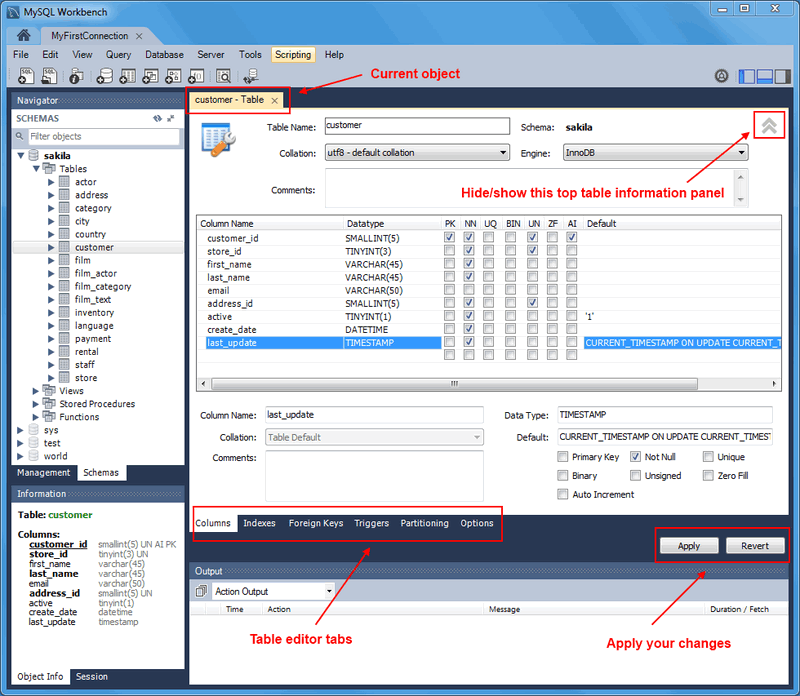
- Columns: Add or modify columns
- Indexes: Add or modify indexes
- Foreign Keys: Add or modify foreign keys
- Triggers: Add or modify triggers
- Partitioning: Manage partitioning
- Options: Add or modify other options, divided in categories named general, row, storage, and merge
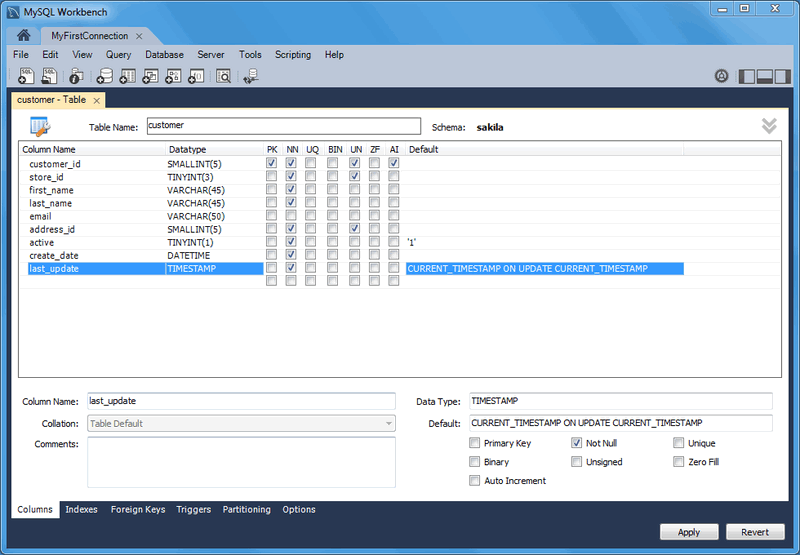
The Columns Tab
Use the Columns tab to display and edit all the column information for a table. With this tab, you can add, drop, and alter columns.
You can also use the Columns tab to change column properties such as name, data type, and default value.
Right-click a row under the Column Name column to open a pop-up menu with the following items:
-
: Move the selected column up.
-
: Move the selected column down.
-
: Copies the column for a model.
-
: Copies and then deletes the column for a model.
-
: Pastes the column. If a column with the same name already exists, then
_copy1 is appended to the column name.
-
: Select multiple contiguous columns by right-clicking and pressing the Shift key. Use the Control key to select separated columns.
-
: Update all information in the Columns tab.
-
: Clear the assigned default value.
-
: Set the column default value to
NULL.
-
: Set the column default value to
0.
-
: Available for
TIMESTAMP data types.
-
: Available for
TIMESTAMP data types.
To add a column, click the Column Name field in an empty row and enter an appropriate value. Select a data type from the Datatype list. Select the column property check boxes as required according to the list of column properties below, and also read the CREATE TABLE documentation for information about what these options mean.
-
PK: PRIMARY KEY
-
NN: NOT NULL
-
UQ: UNIQUE INDEX
-
BIN: BINARY
-
UN: UNSIGNED
-
ZF: ZEROFILL
-
AI: AUTO_INCREMENT
-
G: Generated Column
This option is available as of MySQL Server 5.7.
To change the name, data type, default value, or comment of a column, double-click the value to edit it.
You can also add column comments to the Column Comment field. It is also possible to set the column collation, using the list in the Column Detailspanel.
To the left of the column name is an icon that indicates whether the column is a member of the primary key. If the icon is a small key, that column belongs to the primary key, otherwise the icon is a blue diamond or a white diamond. A blue diamond indicates the column has NN set. To add or remove a column from the primary key, double-click the icon. You can also add a primary key by checking the PRIMARY KEY check box in the Column Details section of the table editor.
If you wish to create a composite primary key you can select multiple columns and check the PK check box. However, there is an additional step that is required, you must click the Indexes tab, then in the Index Columns panel you must set the desired order of the primary keys.
Note
When entering default values, in the case of CHAR and VARCHAR data types MySQL Workbench will attempt to automatically add quotation marks, if the user does not start their entry with one. For other data types the user must manage quoting if required, as it will not be handled automatically by MySQL Workbench.
Caution
Care must be taken when entering a default value forENUM columns because a non-numeric default will not be automatically quoted. You must manually add single quote characters for the default value. Note that MySQL Workbench will not prevent you from entering the default value without the single quotation marks. If a non-numeric default value is entered without quotation marks, this will lead to errors. For example, if the model is reverse engineered, the script will contain unquoted default values for ENUM columns and will fail if an attempt is made to run the script on MySQL Server.
Note
ENUM, BIT, and SET must contain at least one value when entering these data types into MySQL Workbench.
Column Name column to open a pop-up menu with the following items:- : Move the selected column up.
- : Move the selected column down.
- : Copies the column for a model.
- : Copies and then deletes the column for a model.
- : Pastes the column. If a column with the same name already exists, then
_copy1is appended to the column name. - : Select multiple contiguous columns by right-clicking and pressing the Shift key. Use the Control key to select separated columns.
- : Update all information in the Columns tab.
- : Clear the assigned default value.
- : Set the column default value to
NULL. - : Set the column default value to
0. - : Available for
TIMESTAMPdata types. - : Available for
TIMESTAMPdata types.
Column Name field in an empty row and enter an appropriate value. Select a data type from the Datatype list. Select the column property check boxes as required according to the list of column properties below, and also read the CREATE TABLE documentation for information about what these options mean.- PK: PRIMARY KEY
- NN: NOT NULL
- UQ: UNIQUE INDEX
- BIN: BINARY
- UN: UNSIGNED
- ZF: ZEROFILL
- AI: AUTO_INCREMENT
- G: Generated ColumnThis option is available as of MySQL Server 5.7.
Column Comment field. It is also possible to set the column collation, using the list in the Column Detailspanel.PRIMARY KEY check box in the Column Details section of the table editor.
Note
When entering default values, in the case of
CHAR and VARCHAR data types MySQL Workbench will attempt to automatically add quotation marks, if the user does not start their entry with one. For other data types the user must manage quoting if required, as it will not be handled automatically by MySQL Workbench.
Caution
Care must be taken when entering a default value for
ENUM columns because a non-numeric default will not be automatically quoted. You must manually add single quote characters for the default value. Note that MySQL Workbench will not prevent you from entering the default value without the single quotation marks. If a non-numeric default value is entered without quotation marks, this will lead to errors. For example, if the model is reverse engineered, the script will contain unquoted default values for ENUM columns and will fail if an attempt is made to run the script on MySQL Server.
Note
ENUM, BIT, and SET must contain at least one value when entering these data types into MySQL Workbench.
The Indexes Tab
The Indexes tab holds all index information for your table. Use this tab to add, drop, and modify indexes.
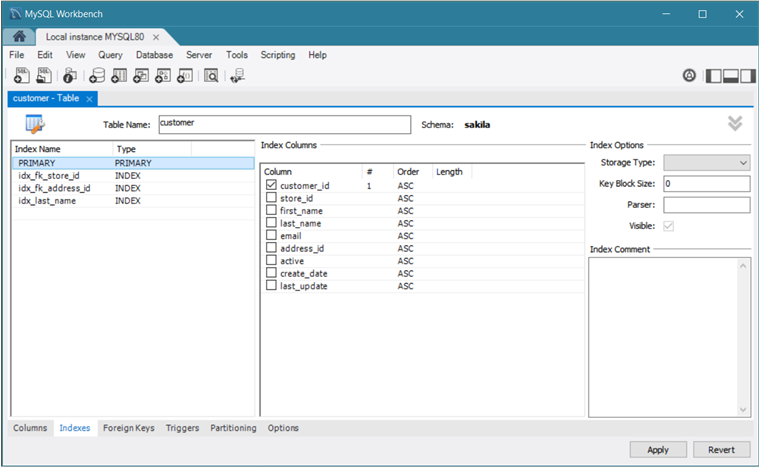
Select an index by right-clicking it. The Index Columns section displays information about the selected index.
To add an index, click the last row in the index list. Enter a name for the index and select the index type from the list. Select the column or columns that you wish to index by checking the column name in the Index Columnslist. You can remove a column from the index by removing the check mark from the appropriate column.
You can also specify the order of an index by choosing
ASC or DESC under the Order column. Create an index prefix by specifying a numeric value under the Length column. You cannot enter a prefix value for fields that have a data type that does not support prefixing.
To drop an index, right-click the row of the index you wish to delete, then select the menu item.
The Foreign Keys Tab
The Foreign Keys tab is organized in much the same fashion as the Indexes tab and adding or editing a foreign key is similar to adding or editing an index.
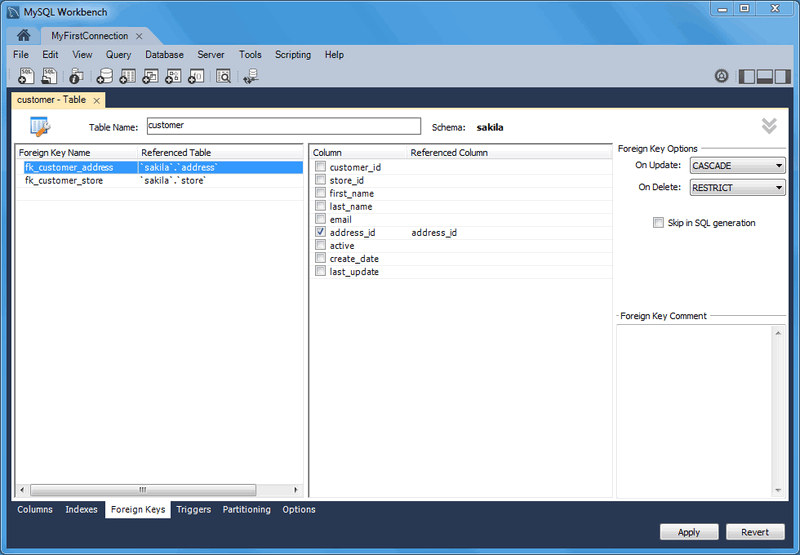
To add a foreign key, click the last row in the
Foreign Key Name list. Enter a name for the foreign key and select the column or columns that you wish to index by checking the column name in the Column list. You can remove a column from the index by removing the check mark from the appropriate column.
Under Foreign Key Options, choose an action for the update and delete events. The options are:
To drop a foreign key, right-click the row you wish to delete, then select the menu item.
To modify properties of a foreign key, select it and make the desired changes.
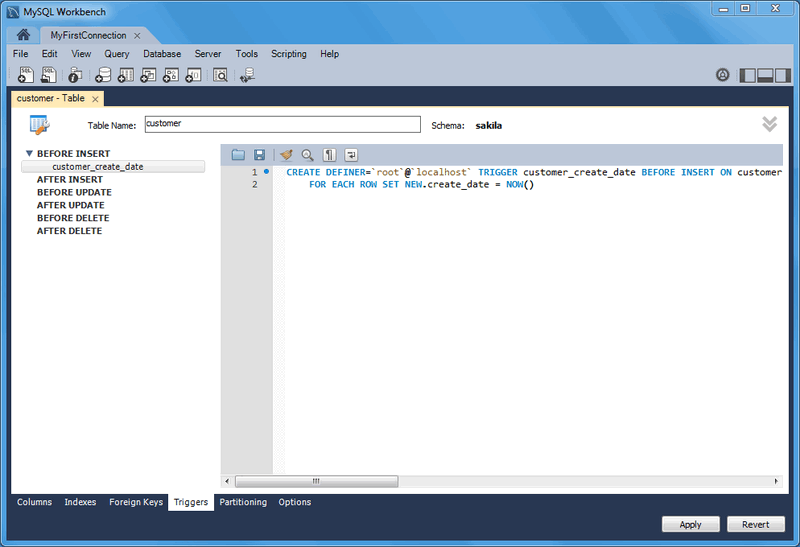
The Triggers Tab
The Triggers tab opens a textbox to create or edit existing triggers.
To add a new trigger, click the [+] icon next to the trigger section. To delete a trigger, click the associated [-] icon. These icons become visible by hovering over a trigger or trigger section. Click to commit your changes.
Figure 8.21 The Triggers Tab
The Partitioning Tab
To enable partitioning for your table, check the Enable Partitioning check box. This enables the partitioning options.
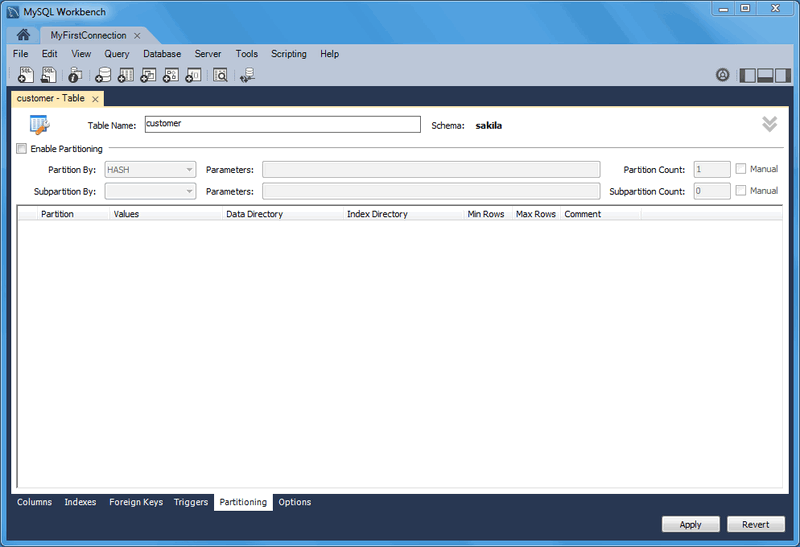
The pop-up menu displays the types of partitions you can create:
Use the Parameters field to define any parameters to be supplied to the partitioning function, such as an integer column value.
Choose the number of partitions from the Partition Count list. To manually configure your partitions, check the Manual check box. This enables entry of values into the partition configuration table. The entries in this table are:
PartitionValuesData DirectoryIndex DirectoryMin RowsMax RowsComment
Subpartitioning is also available. For more information about partitioning, see Partitioning.
The Options Tab
The Options tab enables you to set several types of options.
which are grouped into the following sections:
-
General Options
-
Row Options
-
Storage Options
-
Merge Table options
The following discussion describes these options in more detail.
General Options Section
In the General Options section, choose a pack keys option. The options are Default, Pack None, and Pack All. You may also encrypt the definition of a table. The AUTO_INCREMENT and delayed key update behaviors apply only to MyISAM tables.
Row Options Section
To set the row format, choose the desired row format from the list. For more information about the different row formats that are available, see MyISAM Table Storage Formats.
These options are:
-
Default
-
Dynamic
-
Fixed
-
Compressed
-
Redundant
-
Compact
When you expect a table to be particularly large, use the Avg. Row, Min. Rows, and Max. Rows options to enable the MySQL server to better accommodate your data. See CREATE TABLE Syntax for more information on how to use these options.
Storage Options Section
The Storage Options section is available only for MyISAM tables. Use it to configure a custom path to the table storage and data files. This can help improve server performance by locating different tables on different hard drives.
Merge Table Options Section
Use the Merge Table Options section to configure MERGE tables. To create aMERGE table, select MERGE as your storage engine and then specify the MyISAM tables you wish to merge in the Union Tables dialog.
You may specify the action the server should take when users attempt to perform INSERT statements on the merge table. You may also select the Merge Method by selecting from the list. For more information about MERGEtables, see The MERGE Storage Engine.

- General Options
- Row Options
- Storage Options
- Merge Table options
Default, Pack None, and Pack All. You may also encrypt the definition of a table. The AUTO_INCREMENT and delayed key update behaviors apply only to MyISAM tables.- Default
- Dynamic
- Fixed
- Compressed
- Redundant
- Compact
Storage Options section is available only for MyISAM tables. Use it to configure a custom path to the table storage and data files. This can help improve server performance by locating different tables on different hard drives.Merge Table Options section to configure MERGE tables. To create aMERGE table, select MERGE as your storage engine and then specify the MyISAM tables you wish to merge in the Union Tables dialog.INSERT statements on the merge table. You may also select the Merge Method by selecting from the list. For more information about MERGEtables, see The MERGE Storage Engine.
Code Generation Overview :-
- Generating SQL Statements
- Generating PHP Code
- This document provides a quick hands-on introduction to using MySQL Workbench to generate code for later use, for either in or outside of MySQL Workbench..
Generating SQL Statements
MySQL Workbench can be used to generate SQL, most typically as eitherINSERT statements or SELECT statements.
Below are common methods for generating SQL statements in MySQL Workbench.
Note
All of the MySQL Workbench Export options include the option to export as SQL.
Context-menu options after right-clicking on a schema in the schema view, using the sakila column as an example:
CREATE DATABASE `sakila` /*!40100 DEFAULT CHARACTER SET latin1 */;
`sakila`
Context-menu options after right-clicking on a table in the schema view, using the sakila.actor column as an example:
`actor`
`sakila`.`actor`
SELECT `actor`.`actor_id`,
    `actor`.`first_name`,
    `actor`.`last_name`,
    `actor`.`last_update`
FROM `sakila`.`actor`;
SET @actor_id_to_select = <{row_id}>;
SELECT film_actor.*
    FROM film_actor, actor
    WHERE `actor`.`actor_id` = `film_actor`.`actor_id`
          AND actor.actor_id = @actor_id_to_select;
SELECT actor.*
    FROM actor
    WHERE actor.actor_id = @actor_id_to_select;
INSERT INTO `sakila`.`actor`
  (`actor_id`,
  `first_name`,
  `last_name`,
  `last_update`)
VALUES
  (<{actor_id: }>,
  <{first_name: }>,
  <{last_name: }>,
  <{last_update: CURRENT_TIMESTAMP}>);
UPDATE `sakila`.`actor`
SET
`actor_id` = <{actor_id: }>,
`first_name` = <{first_name: }>,
`last_name` = <{last_name: }>,
`last_update` = <{last_update: CURRENT_TIMESTAMP}>
WHERE `actor_id` = <{expr}>;
DELETE FROM `sakila`.`actor`
WHERE <{where_expression}>;
-- All objects that reference that row (directly or indirectly)
-- will be deleted when this snippet is executed.
-- To preview the rows to be deleted, use Select Row Dependencies
START TRANSACTION;
-- Provide the values of the primary key of the row to delete.
SET @actor_id_to_delete = <{row_id}>;

DELETE FROM film_actor
    USING film_actor, actor
    WHERE `actor`.`actor_id` = `film_actor`.`actor_id`
          AND actor.actor_id = @actor_id_to_delete;
DELETE FROM actor
    USING actor
    WHERE actor.actor_id = @actor_id_to_delete;
COMMIT;
CREATE TABLE `actor` (
  `actor_id` smallint(5) unsigned NOT NULL AUTO_INCREMENT,
  `first_name` varchar(45) NOT NULL,
  `last_name` varchar(45) NOT NULL,
  `last_update` timestamp NOT NULL DEFAULT CURRENT_TIMESTAMP ON UPDATE CURRENT_TIMESTAMP,
  PRIMARY KEY (`actor_id`),
  KEY `idx_actor_last_name` (`last_name`)
) ENGINE=InnoDB AUTO_INCREMENT=201 DEFAULT CHARSET=utf8;
Context-menu options after right-clicking on a column in the schema view, using the sakila.actor.first_name column as an example:
`first_name`
`actor`.`first_name`
SELECT `first_name` FROM `sakila`.`actor`;
INSERT INTO `sakila`.`actor`
(`first_name`)
VALUES
(<{first_name}>);
UPDATE `sakila`.`actor`
SET
`first_name` = <{first_name}>
WHERE <{where_expression}>;
Context-menu options after right-clicking on a field in the results view, using record #1 in the sakila.actor table as an example:
# actor_id, first_name, last_name, last_update
'1', 'PENELOPE', 'GUINESS', '2006-02-15 04:34:33'
# actor_id, first_name, last_name, last_update
1, PENELOPE, GUINESS, 2006-02-15 04:34:33
1 PENELOPE GUINESS 2006-02-15 04:34:33
'GUINESS'
INSERT statements or SELECT statements.
Note
All of the MySQL Workbench Export options include the option to export as SQL.
schema in the schema view, using the sakila column as an example:CREATE DATABASE `sakila` /*!40100 DEFAULT CHARACTER SET latin1 */;`sakila`table in the schema view, using the sakila.actor column as an example:`actor``sakila`.`actor`SELECT `actor`.`actor_id`,
`actor`.`first_name`,
`actor`.`last_name`,
`actor`.`last_update`
FROM `sakila`.`actor`;SET @actor_id_to_select = <{row_id}>;
SELECT film_actor.*
FROM film_actor, actor
WHERE `actor`.`actor_id` = `film_actor`.`actor_id`
AND actor.actor_id = @actor_id_to_select;
SELECT actor.*
FROM actor
WHERE actor.actor_id = @actor_id_to_select;INSERT INTO `sakila`.`actor`
(`actor_id`,
`first_name`,
`last_name`,
`last_update`)
VALUES
(<{actor_id: }>,
<{first_name: }>,
<{last_name: }>,
<{last_update: CURRENT_TIMESTAMP}>);UPDATE `sakila`.`actor`
SET
`actor_id` = <{actor_id: }>,
`first_name` = <{first_name: }>,
`last_name` = <{last_name: }>,
`last_update` = <{last_update: CURRENT_TIMESTAMP}>
WHERE `actor_id` = <{expr}>;DELETE FROM `sakila`.`actor`
WHERE <{where_expression}>;-- All objects that reference that row (directly or indirectly)
-- will be deleted when this snippet is executed.
-- To preview the rows to be deleted, use Select Row Dependencies
START TRANSACTION;
-- Provide the values of the primary key of the row to delete.
SET @actor_id_to_delete = <{row_id}>;
DELETE FROM film_actor
USING film_actor, actor
WHERE `actor`.`actor_id` = `film_actor`.`actor_id`
AND actor.actor_id = @actor_id_to_delete;
DELETE FROM actor
USING actor
WHERE actor.actor_id = @actor_id_to_delete;
COMMIT;CREATE TABLE `actor` (
`actor_id` smallint(5) unsigned NOT NULL AUTO_INCREMENT,
`first_name` varchar(45) NOT NULL,
`last_name` varchar(45) NOT NULL,
`last_update` timestamp NOT NULL DEFAULT CURRENT_TIMESTAMP ON UPDATE CURRENT_TIMESTAMP,
PRIMARY KEY (`actor_id`),
KEY `idx_actor_last_name` (`last_name`)
) ENGINE=InnoDB AUTO_INCREMENT=201 DEFAULT CHARSET=utf8;column in the schema view, using the sakila.actor.first_name column as an example:`first_name``actor`.`first_name`SELECT `first_name` FROM `sakila`.`actor`;INSERT INTO `sakila`.`actor`
(`first_name`)
VALUES
(<{first_name}>);UPDATE `sakila`.`actor`
SET
`first_name` = <{first_name}>
WHERE <{where_expression}>;field in the results view, using record #1 in the sakila.actor table as an example:# actor_id, first_name, last_name, last_update
'1', 'PENELOPE', 'GUINESS', '2006-02-15 04:34:33'# actor_id, first_name, last_name, last_update
1, PENELOPE, GUINESS, 2006-02-15 04:34:331 PENELOPE GUINESS 2006-02-15 04:34:33'GUINESS'
Generating PHP Code
MySQL Workbench can be used to generate PHP code with the bundled PHP plugin, by using the , , menu option.
Below is an example scenario for how to create PHP code. It is a
SELECTstatement, and optionally uses SET to set variables.
SQL @variables generate PHP variables in the code that then bind to the statement before execution.
- Generate or type in the desired SQL query into the SQL editor. This example will use the
sakiladatabase, with the query being:SET @last_update = '2006-02-14'; SELECT actor_id, first_name, last_name, last_update FROM actor WHERE last_update > @last_update; - While in the SQL editor, choose , , from the main menu. This will copy PHP code to the clipboard.
- Paste the code to the desired location.
Additionally, PHP code that connects to the MySQL database can also be generated by choosing , , .
After combining the two, the generated PHP code will look like this:
<?php

$host     = "localhost";
$port     = 3306;
$socket   = "";
$user     = "nobody";
$password = "";
$dbname   = "sakila";

$con = new mysqli($host, $user, $password, $dbname, $port, $socket)
    or die ('Could not connect to the database server' . mysqli_connect_error());

//$con->close();

$query = "SELECT actor_id, first_name, last_name, last_update
          FROM   actor
          WHERE  last_update > ?";
$last_update = '';

$stmt->bind_param('s', $last_update);

if ($stmt = $con->prepare($query)) {

    $stmt->execute();
    $stmt->bind_result($actor_id, $first_name, $last_name, $last_update);

    while ($stmt->fetch()) {
        // printf("%s, %s, %s, %s\n",
        //   $actor_id, $first_name, $last_name, $last_update);
    }

    $stmt->close();
}

?>
Note
The generated PHP code uses the
mysqli PHP extension for MySQL. This extension must be enabled in your PHP distribution for this code to work. For additional details about this PHP extension, see MySQL Improved Extension.
Regard's
Muhammad Waseem Mayo
+923007396305
Muhammad Waseem Mayo
+923007396305


Comments
Post a Comment