Manage Server Connections In My SQL
5.3.1 Standard TCP/IP Connection Method
This connection method enables MySQL Workbench to connect to MySQL Server using TCP/IP.
Note
The --skip-networking MySQL server configuration option affects the TCP/IP connection method. If disabled, use named pipes or shared memory (on Windows) or Unix socket files (on Unix).
Note
The
--skip-networking MySQL server configuration option affects the TCP/IP connection method. If disabled, use named pipes or shared memory (on Windows) or Unix socket files (on Unix).Parameters Tab
The parameters for standard TCP/IP connections are:
-
Hostname: The host name or IP address of the MySQL server.
Note
The host name "localhost" might resolve to "127.0.0.1" or "::1" on your host, so note this when checking permissions. For example, if a web application's user only has access to "127.0.0.1" on a host, and a defined connection uses "localhost" that resolves to "::1", this connection may lack the proper permissions to the aforementioned web application. Ping "localhost" on each host to determine where it resolves to.
-
Port: The TCP/IP port on which the MySQL server is listening (the default is 3306).
-
Username: User name to use for the connection.
-
Password: Optional password for the account used. If you enter no password here, you will be prompted to enter the password when MySQL Workbench attempts to establish the connection. MySQL Workbench can store the password in a vault (see Section 5.3.8, “The Password Storage Vault”).
-
Default Schema: When the connection to the server is established, this is the schema that will be used by default. It becomes the default schema for use in other parts of MySQL Workbench.
- Hostname: The host name or IP address of the MySQL server.NoteThe host name "localhost" might resolve to "127.0.0.1" or "::1" on your host, so note this when checking permissions. For example, if a web application's user only has access to "127.0.0.1" on a host, and a defined connection uses "localhost" that resolves to "::1", this connection may lack the proper permissions to the aforementioned web application. Ping "localhost" on each host to determine where it resolves to.
- Port: The TCP/IP port on which the MySQL server is listening (the default is 3306).
- Username: User name to use for the connection.
- Password: Optional password for the account used. If you enter no password here, you will be prompted to enter the password when MySQL Workbench attempts to establish the connection. MySQL Workbench can store the password in a vault (see Section 5.3.8, “The Password Storage Vault”).
- Default Schema: When the connection to the server is established, this is the schema that will be used by default. It becomes the default schema for use in other parts of MySQL Workbench.
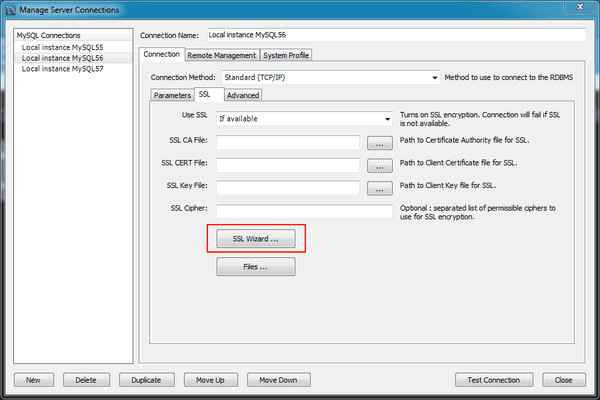
SSL Tab
SSL parameters are:
-
Use SSL: This dropdown provides options related to enabling SSL encryption. Choose No to disable SSL, If available if the client library supports it, orRequire to require SSL support for the MySQL connection to succeed. This option defaults to If available.
-
SSL Key File: Path to the Key file for SSL.
-
SSL CERT File: Path the Certificate file for SSL.
-
SSL CA File: Path to the Certification Authority file for SSL.
-
SSL Cipher: Optional list of permissible ciphers to use for SSL encryption.
-
button: Generate SSL certificates for both the MySQL server and MySQL client. Requires access to OpenSSL binaries in the system's PATH. For additional information, see Section 5.3.4, “SSL Wizard (Certificates)”.
-
button: Opens a file browser that points to the generated SSL files by the SSL Wizard. For additional information, see Section 5.3.4, “SSL Wizard (Certificates)”
- Use SSL: This dropdown provides options related to enabling SSL encryption. Choose No to disable SSL, If available if the client library supports it, orRequire to require SSL support for the MySQL connection to succeed. This option defaults to If available.
- SSL Key File: Path to the Key file for SSL.
- SSL CERT File: Path the Certificate file for SSL.
- SSL CA File: Path to the Certification Authority file for SSL.
- SSL Cipher: Optional list of permissible ciphers to use for SSL encryption.
- button: Generate SSL certificates for both the MySQL server and MySQL client. Requires access to OpenSSL binaries in the system's PATH. For additional information, see Section 5.3.4, “SSL Wizard (Certificates)”.
- button: Opens a file browser that points to the generated SSL files by the SSL Wizard. For additional information, see Section 5.3.4, “SSL Wizard (Certificates)”
Advanced Tab
The Advanced tab includes these check boxes:
-
Use compression protocol: If checked, the communication between the application and the MySQL server will be compressed, which may increase transfer rates. This corresponds to starting a MySQL command-line client with the
--compress option. This option is unchecked by default.
-
Use ANSI quotes to quote identifiers: Treat “"” as an identifier quote character (like the “`” quote character) and not as a string quote character. You can still use “`” to quote identifiers with this mode enabled. With this option enabled, you cannot use double quotation marks to quote literal strings, because it is interpreted as an identifier. Note: If this option is checked, it overrides the server setting. This option is unchecked by default.
-
Enable Cleartext Authentication Plugin: Send the user password in cleartext. Required for some authentication methods. This option is unchecked by default.
-
Use the old authentication protocol: This option disables the Connector/C++
secure_auth option. This option is unchecked by default. Doing so means you can connect to MySQL Server with MySQL users that utilize the old mysql_old_password authentication plugin, which is not recommended. mysql_old_password support was removed in MySQL Server 5.7.
Note
This option was removed in Workbench 6.3.6, and did not function in Workbench 6.3.5. For information about upgrading passwords from the old authentication protocol, see Section 5.3.9, “Updating Old Authentication Protocol Passwords”.
Also, MySQL Server 5.7 does not support the old authentication protocol, because secure_auth cannot be disabled. Using the old mysql_old_password has not been recommended since MySQL 4.1.
It also includes these options:
Timeout: Maximum time to wait before the connection is aborted. The connection times out in 60 seconds by default.
SQL_MODE: Override the default SQL_MODE used by the server.
Others: Other options for Connector/C++ as option=value pairs, one per line....
- Use compression protocol: If checked, the communication between the application and the MySQL server will be compressed, which may increase transfer rates. This corresponds to starting a MySQL command-line client with the
--compressoption. This option is unchecked by default. - Use ANSI quotes to quote identifiers: Treat “"” as an identifier quote character (like the “`” quote character) and not as a string quote character. You can still use “`” to quote identifiers with this mode enabled. With this option enabled, you cannot use double quotation marks to quote literal strings, because it is interpreted as an identifier. Note: If this option is checked, it overrides the server setting. This option is unchecked by default.
- Enable Cleartext Authentication Plugin: Send the user password in cleartext. Required for some authentication methods. This option is unchecked by default.
- Use the old authentication protocol: This option disables the Connector/C++
secure_authoption. This option is unchecked by default. Doing so means you can connect to MySQL Server with MySQL users that utilize the oldmysql_old_passwordauthentication plugin, which is not recommended.mysql_old_passwordsupport was removed in MySQL Server 5.7.NoteThis option was removed in Workbench 6.3.6, and did not function in Workbench 6.3.5. For information about upgrading passwords from the old authentication protocol, see Section 5.3.9, “Updating Old Authentication Protocol Passwords”.Also, MySQL Server 5.7 does not support the old authentication protocol, because secure_auth cannot be disabled. Using the oldmysql_old_passwordhas not been recommended since MySQL 4.1.
SQL_MODE used by the server.
2.3.2 Launching
To start MySQL Workbench on Windows, select , , , then select MySQL Workbench. This executes the MySQLWorkbench.exe file on your system.
Alternatively, start MySQL Workbench from the command line. To view the available command-line options, issue the command MySQLWorkbench -helpfrom the MySQL Workbench installation directory. You will see the following output:
MySQLWorkbench.exe [<options>] [<name of a model file or sql script>]

Options:
  -swrendering           Force the diagram canvas to use software rendering instead of OpenGL
  -query [<connection>|<connection string>]
                         Open a query tab and ask for connection if nothing is specified.
                         If named connection is specified it will be opened, else connection
                         will be created based on the given connection string, which should
                         be in form <user>@<host>:<port>
  -admin <instance>      Open a administration tab to the named instance
  -upgrade-mysql-dbs     Open a migration wizard tab
  -model <model file>    Open the given EER model file
  -script <sql file>     Open the given SQL file in an connection, best in conjunction with
                         a query parameter
  -run-script <file>     Execute Python code from a file
  -run <code>            Execute the given Python code
  -run-python <code>     Execute the given Python code
  -migration             Open the Migration Wizard tab
  -quit-when-done        Quit Workbench when the script is done
  -log-to-stderr         Also log to stderr
  -help, -h              Show command line options and exit
  -log-level=<level>     Valid levels are: error, warning, info, debug1, debug2, debug3
  -verbose, -v           Enable diagnostics output
  -version               Show Workbench version number and exit
  -open <file>           Open the given file at startup (deprecated, use script, model etc.)
Use the -swrendering option if your video card does not support OpenGL 1.5. The -version option can be used to display the MySQL Workbench version number. The other options are self-explanatory.
MySQL Workbench may also be started from MySQL Notifier by choosing or from the Notifier context menu. For additional information, see MySQL Notifier.
MySQLWorkbench.exe file on your system.-swrendering option if your video card does not support OpenGL 1.5. The -version option can be used to display the MySQL Workbench version number. The other options are self-explanatory.
2.3.3 Uninstalling..
The method for uninstalling MySQL Workbench depends on how you installed MySQL Workbench.
Removing MySQL Workbench After Installation Using the Installer Package
-
To uninstall MySQL Workbench, open the Control Panel and Choose Add or Remove Programs. Find the MySQL Workbench entry and choose the button. This will remove MySQL Workbench.
Note
If you installed MySQL Workbench using the Installer package, it is not possible to remove MySQL Workbench from the command line. Although you can manually remove some of the components, there is no command-line option for removing MySQL Workbench.
Removing the MySQL Workbench directory manually will not remove all the files belonging to MySQL Workbench.
Removing MySQL Workbench After Installation from the MySQL Installer
Open the MySQL Installer for Windows, click Remove MySQL Products, choose MySQL Workbench, and then .
- To uninstall MySQL Workbench, open the Control Panel and Choose Add or Remove Programs. Find the MySQL Workbench entry and choose the button. This will remove MySQL Workbench.
Note
If you installed MySQL Workbench using the Installer package, it is not possible to remove MySQL Workbench from the command line. Although you can manually remove some of the components, there is no command-line option for removing MySQL Workbench.
Removing the MySQL Workbench directory manually will not remove all the files belonging to MySQL Workbench.
What Is Not Removed
Uninstalling MySQL Workbench does not remove your Workbench configuration directory. This directory includes your MySQL connections, configuration settings, cache files, SQL snippets and history, logs, custom modules, and more. These files are stored under your user's %AppData% directory.
Note
By default, the Workbench configuration directory isC:\username\AppData\Roaming\MySQL\Workbench\ where "C:\username\AppData\Roaming\" is the value of your%AppData% Windows system variable.
Also, uninstalling Workbench does not remove the .mysqlworkbench schema that Workbench creates when sharing SQL snippets across a MySQL connection. For additional information about shared snippets, see Section 8.1.5, “SQL Snippets Tab”.
Uninstalling MySQL Workbench does not remove your Workbench configuration directory. This directory includes your MySQL connections, configuration settings, cache files, SQL snippets and history, logs, custom modules, and more. These files are stored under your user's
%AppData% directory.
Note
By default, the Workbench configuration directory is
C:\username\AppData\Roaming\MySQL\Workbench\ where "C:\username\AppData\Roaming\" is the value of your%AppData% Windows system variable.
Also, uninstalling Workbench does not remove the
.mysqlworkbench schema that Workbench creates when sharing SQL snippets across a MySQL connection. For additional information about shared snippets, see Section 8.1.5, “SQL Snippets Tab”.Local Socket/Pipe Connection Method:-
This connection method enables MySQL Workbench to connect to MySQL Server using a socket file (on Unix) or a named pipe (on Windows).
This connection method enables MySQL Workbench to connect to MySQL Server using a socket file (on Unix) or a named pipe (on Windows).
Parameters Tab
In addition to a number of parameters that are in common with Standard TCP/IP connections, this connection method includes a unique field to configure the socket path or pipe name. As the following figure shows, you can supply the path to the socket file or pipe name within this dialog. If the field is left blank, the default socket or pipe name is used. On Unix, the default socket name is /tmp/mysql.sock. On Microsoft Windows, the default pipe name is MySQL.
In addition to a number of parameters that are in common with Standard TCP/IP connections, this connection method includes a unique field to configure the socket path or pipe name. As the following figure shows, you can supply the path to the socket file or pipe name within this dialog. If the field is left blank, the default socket or pipe name is used. On Unix, the default socket name is
/tmp/mysql.sock. On Microsoft Windows, the default pipe name is MySQL.
SSL Tab
The SSL options for this connection method are the same as the options described in Section 5.3.1, “Standard TCP/IP Connection Method”.
The SSL options for this connection method are the same as the options described in Section 5.3.1, “Standard TCP/IP Connection Method”.
Advanced Tab
The advanced options for this connection method are the same as the options described in Section 5.3.1, “Standard TCP/IP Connection Method”, except the Use compression protocol and Timeout options do not apply...
The advanced options for this connection method are the same as the options described in Section 5.3.1, “Standard TCP/IP Connection Method”, except the Use compression protocol and Timeout options do not apply...
Standard TCP/IP over SSH Connection Method:-
This connection method enables MySQL Workbench to connect to MySQL Server using TCP/IP over an SSH connection.
Note
Because TLSv1.2 requires OpenSSL, support for this protocol is available for MySQL Workbench Commercial Editions, and not for the Community Edition (which is compiled using yaSSL and supports TLSv1.1 only).
Note
Because TLSv1.2 requires OpenSSL, support for this protocol is available for MySQL Workbench Commercial Editions, and not for the Community Edition (which is compiled using yaSSL and supports TLSv1.1 only).
Parameters Tab
In addition to a number of parameters that are in common with Standard TCP/IP connections, this connection method features a number of specialized parameters. These options are:
-
SSH Hostname: The name of the SSH server. An optional port number can also be provided. For example,
localhost:22.
-
SSH Username: The name of the SSH user to use to make a connection.
-
SSH Password: The SSH password. It is recommended that an SSH key file is also used.
-
SSH Key File: A path to the SSH key file.
If a remote host is missing from the system's list of known hosts, a prompt requires you to confirm the host's fingerprint before storing it. If your stored host fingerprint is different than the host's current fingerprint, then an error is generated and you will be required to handle the discrepancy from outside of MySQL Workbench before creating the connection. Prior to MySQL Workbench 6.1.6, the host SSH fingerprint was not saved by MySQL Workbench.
On Linux and macOS, SSH host fingerprints are stored in ~/.ssh/known_hosts. On Microsoft Windows, they are stored in a file created by MySQL Workbench under the user's application data folder (%appdata%), such as C:\Users\[username]\AppData\Roaming\MySQL\Workbench\known_hosts.
The following figure shows the SSH connection settings.
- SSH Hostname: The name of the SSH server. An optional port number can also be provided. For example,
localhost:22. - SSH Username: The name of the SSH user to use to make a connection.
- SSH Password: The SSH password. It is recommended that an SSH key file is also used.
- SSH Key File: A path to the SSH key file.
~/.ssh/known_hosts. On Microsoft Windows, they are stored in a file created by MySQL Workbench under the user's application data folder (%appdata%), such as C:\Users\[username]\AppData\Roaming\MySQL\Workbench\known_hosts.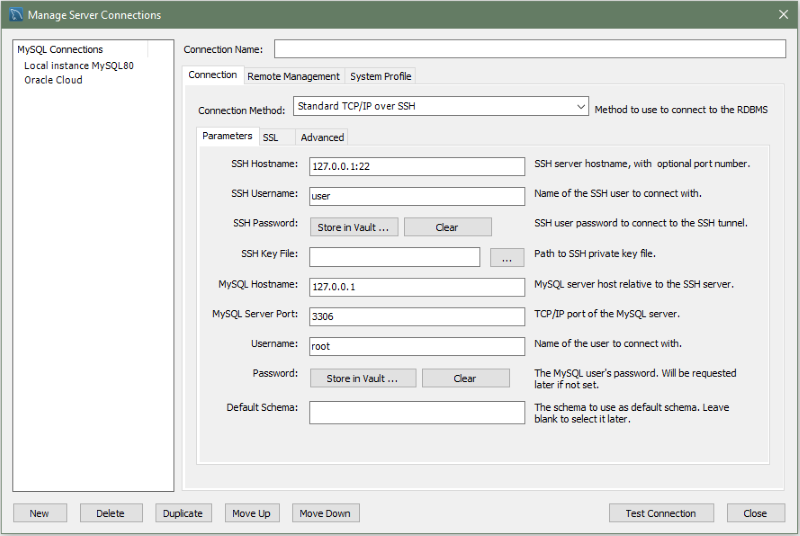
SSL Tab
The SSL options for this connection method are the same as the options described in Section 5.3.1, “Standard TCP/IP Connection Method”.
Advanced Tab
The advanced options for this connection method are the same as the options described in Section 5.3.1, “Standard TCP/IP Connection Method”, except the Timeout option does not apply..
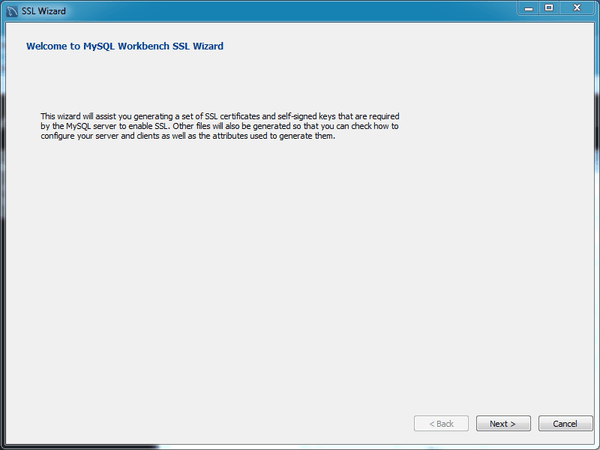
SSL Wizard (Certificates) :-
This wizard helps create SSL certificates for both MySQL clients and MySQL servers. Connections in MySQL Workbench are updated with the certificates by the wizard. This wizard requires OpenSSL to create the certificates. An example MySQL configuration file (
my.cnf / my.ini) is also generated that utilizes the generated certificates.
Note
The OpenSSL binary should be in the system's PATH.
Start the SSL wizard from the SSL tab of a MySQL server connection. Locate this tab in the MySQL connection editor. Click to execute the wizard, as the following figure shows.
Read the informative text on the welcome screen (displayed in the following figure), and then click .
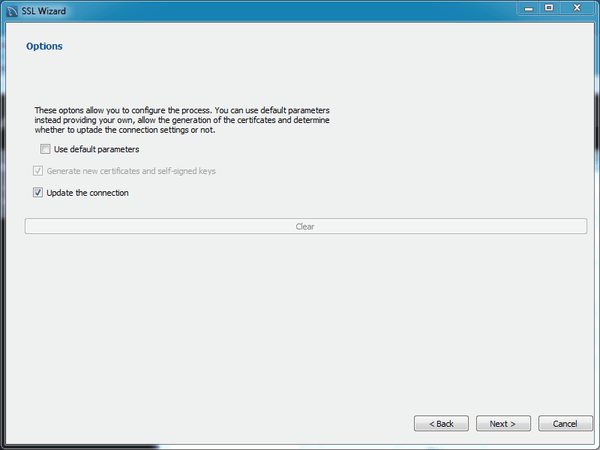
Check the options that apply. The following figure shows an example of the available options.
- Use default parameters: Check this to skip entering the optional attributes, such as Country, State, Organization, and so on. By default, these fields are empty.
- Generate new certificates and self-signed keys: Check this to generate new files, otherwise the existing files are used. You might disable this if you already generated SSL certificates but forgot where the files are located, or how to configure them.
- Update the connection: Updates the defined MySQL connection (in Workbench) with the generated certificate information.
The results page describes the generated files, and provides requirements that you must perform to complete the operation. For example, you must manually edit your MySQL configuration file (
my.ini or my.cnf) and define the SSL options.
The following figure shows an example Results screen. Consider leaving this screen open, and close it after you copied the files and altered your MySQL configuration file to enable SSL connections. The wizard does not perform these actions for you.
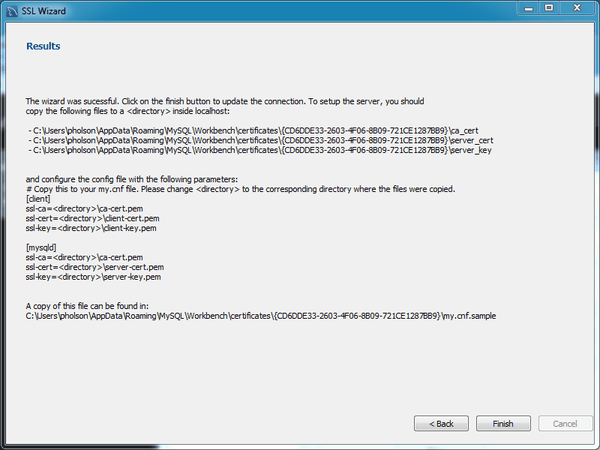
Here an example process of using the generated SSL files to set up an SSL connection. Adjust your paths as they will be different.
- Create a directory to store the certificate files. In our simple example, we have MySQL Workbench installed on the same host as the MySQL Server, and we created "
C:\certs" on this system. - Copy and paste the results to a new (temporary) file, but change <directory> to the path (
C:\certs) we created. For example:[client] ssl-ca=C:\certs\ca-cert.pem ssl-cert=C:\certs\client-cert.pem ssl-key=C:\certs\client-key.pem [mysqld] ssl-ca=C:\certs\ca-cert.pem ssl-cert=C:\certs\\server-cert.pem ssl-key=C:\certs\\server-key.pemWarningMySQL Server interprets "\s" as a space, so we added an extra backslash to escape it. That is why you see "\\server-key.pem" in the above example, because MySQL Server would interpret "\server-key.pem" as " erver-key.pem". - Open the MySQL Server configuration file. In this example, its location is "
C:\ProgramData\MySQL\MySQL Server 5.7\my.ini".NoteThe location of your configuration file depends on how MySQL Server was installed. The connection editor defines and displays its location, as does the Options File page in MySQL Workbench. - Add the client certificate information under the
[client]section:[client] ssl-ca=C:\certs\ca-cert.pem ssl-cert=C:\certs\client-cert.pem ssl-key=C:\certs\client-key.pemAdd the server certificate information under the[mysqld]section:[mysqld] ssl-ca=C:\certs\ca-cert.pem ssl-cert=C:\certs\\server-cert.pem ssl-key=C:\certs\\server-key.pem - Update the paths to the SSL client certificates in your MySQL connection, under the SSL tab. There are three paths to update.
- Restart the MySQL Server. In the log, you should see something like "Warning CA certificate
C:\certs\ca-cert.pemis self signed." - In MySQL Workbench's MySQL connection editor, clicking should confirm your SSL connection.
Additionally, consider setting Use SSL to "Required". Or, if you are experiencing problems, set it to "If available" while debugging the problem...
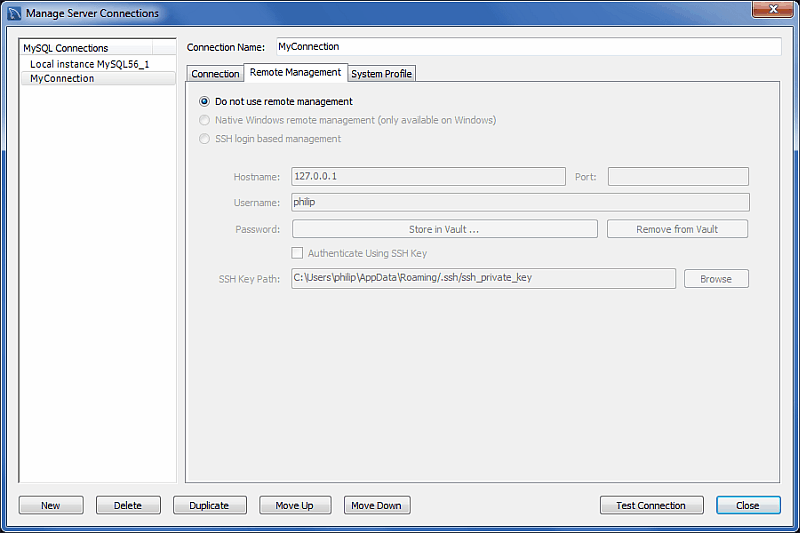
Remote Management:-
The Remote Management tab is available when connecting to MySQL remotely, as the following figure shows. To access this tab, select a remote connection from the MySQL Connections pane or click to create a new connection.
System Profile:-
The System Profile tab enables you to specify host-specific information. This is achieved primarily through selecting a System Type, along with its corresponding Installation Type. These profile settings contain standard information that is used in managing the host's MySQL instance.
Here are some of the available installation types:
-
FreeBSD, MySQL package or Custom
-
Linux, including distributions such as Fedora, Oracle, RHEL, SLES, Ubuntu, Generic, and Custom
-
macOS, MySQL package or Custom
-
OpenSolaris, MySQL package or Custom
-
Windows, with different installation methods, MySQL versions, and build architectures
Choose the appropriate System Type and Installation Type to set default parameters that includes commands used to start and stop MySQL, commands to check the server status, the location of the my.ini or my.cnf configuration file, and on Windows, the Windows Service Name. As the following figure shows, these default values are customizable.
The System Profile tab enables you to specify host-specific information. This is achieved primarily through selecting a System Type, along with its corresponding Installation Type. These profile settings contain standard information that is used in managing the host's MySQL instance.
Here are some of the available installation types:
- FreeBSD, MySQL package or Custom
- Linux, including distributions such as Fedora, Oracle, RHEL, SLES, Ubuntu, Generic, and Custom
- macOS, MySQL package or Custom
- OpenSolaris, MySQL package or Custom
- Windows, with different installation methods, MySQL versions, and build architectures
Choose the appropriate System Type and Installation Type to set default parameters that includes commands used to start and stop MySQL, commands to check the server status, the location of the
my.ini or my.cnf configuration file, and on Windows, the Windows Service Name. As the following figure shows, these default values are customizable.
Configure Server Management Wizard:-
Clicking the [+] icon from the home screen launches the Setup New Connectionwizard. The wizard provides a MySQL connection form to create a new MySQL connection, and includes a option as a step-by-step approach to creating a new MySQL server connection.
This option can also be executed later (on remote connections) from the home screen by clicking the top right corner of a MySQL remote connection, as the following figure shows.
Executing this wizard is required to perform tasks requiring shell access to the host. For example, starting/stopping the MySQL instance and editing the configuration file.
For a tutorial that demonstrates the steps outlined below, see the tutorial titledSection 5.2, “Creating A New MySQL Connection (Tutorial)”.
The steps presented in the wizard are as follows:
-
Test DB Connection
On this page, MySQL Workbench tests your database connection and displays the results. If an error occurs, click to view the related logs.
-
Management and OS
Used to specify a remote management type and target operating system, which is available when the Host Machine is defined as a remote host.
The SSH login based management option includes configuration entries for the Operating System and MySQL Installation Type.
-
SSH Configuration
If you specified a Remote Host on the Specify Host Machine page, you will be presented with the Host SSH Connection page, that enables you to use SSH for the connection to the server instance. This facility enables you to create a secure connection to remotely administer and configure the server instance. You must enter the host name and user name of the account that will be used to log in to the server for administration and configuration activities. If you do not enter the optional SSH Key for use with the server, then you will be prompted for the password when the connection is established by MySQL Workbench.
Note
This connection is to enable remote administration and configuration of the MySQL Server itself. It is not the same as the connection used to connect to a server for general database manipulation.
Note
You must use an SSH connection type when managing a remote server if you wish to start or stop the server or edit its configuration file. Other administrative functions do not require an SSH connection.
-
Windows Management
If a Windows server is used, then setting the Windows configuration parameters is mandatory. Windows management requires a user account with the required privileges to query the system status, and to control services. And read/write access to the configuration file is needed to allow editing of the file.
-
Test Settings
The wizard now attempts a connection to your server and reports the results. If an error occurs, click to view the related logs.
MySQL Workbench must know where the MySQL Server configuration file is located to be able to display configuration information. The wizard is able to determine the most likely location of the configuration file, based on the selection made on the Operating System page of the wizard. However, it is possible to test that this information is correct by clicking the and buttons. The wizard then reports whether the configuration file and server configuration section can in fact be accessed. It is also possible to manually enter the location of the configuration file, and the section pertaining to MySQL Server data; these manually entered values should be tested using the buttons provided. Click the button to continue.
-
Review Settings
The modified settings may be reviewed, which also includes the default values. Check the Change Parameters checkbox if the MySQL Config File section will be edited, and then click to continue.
-
MySQL Config File
Allows configuration of the MySQL server version. It also allows the editing and validation of the configuration file path, and validation of the server instance section. Click to continue.
-
Specify Commands
Optionally set the commands required to start, stop, and check the status of the running MySQL server instance. Commands can be customized, if required, but the defaults are suitable in most cases. The defaults depend on the selected options on the Operating System page of the wizard. Click to continue.
-
Complete Setup
Name the MySQL server instance on the final step. This name is used throughout MySQL Workbench as a reference to this MySQL connection. After setting a suitable name, click to save the instance...

- Test DB ConnectionOn this page, MySQL Workbench tests your database connection and displays the results. If an error occurs, click to view the related logs.
- Management and OSUsed to specify a remote management type and target operating system, which is available when the Host Machine is defined as a remote host.The SSH login based management option includes configuration entries for the Operating System and MySQL Installation Type.
- SSH ConfigurationIf you specified a Remote Host on the Specify Host Machine page, you will be presented with the Host SSH Connection page, that enables you to use SSH for the connection to the server instance. This facility enables you to create a secure connection to remotely administer and configure the server instance. You must enter the host name and user name of the account that will be used to log in to the server for administration and configuration activities. If you do not enter the optional SSH Key for use with the server, then you will be prompted for the password when the connection is established by MySQL Workbench.NoteThis connection is to enable remote administration and configuration of the MySQL Server itself. It is not the same as the connection used to connect to a server for general database manipulation.NoteYou must use an SSH connection type when managing a remote server if you wish to start or stop the server or edit its configuration file. Other administrative functions do not require an SSH connection.
- Windows ManagementIf a Windows server is used, then setting the Windows configuration parameters is mandatory. Windows management requires a user account with the required privileges to query the system status, and to control services. And read/write access to the configuration file is needed to allow editing of the file.
- Test SettingsThe wizard now attempts a connection to your server and reports the results. If an error occurs, click to view the related logs.MySQL Workbench must know where the MySQL Server configuration file is located to be able to display configuration information. The wizard is able to determine the most likely location of the configuration file, based on the selection made on the Operating System page of the wizard. However, it is possible to test that this information is correct by clicking the and buttons. The wizard then reports whether the configuration file and server configuration section can in fact be accessed. It is also possible to manually enter the location of the configuration file, and the section pertaining to MySQL Server data; these manually entered values should be tested using the buttons provided. Click the button to continue.
- Review SettingsThe modified settings may be reviewed, which also includes the default values. Check the Change Parameters checkbox if the MySQL Config File section will be edited, and then click to continue.
- MySQL Config FileAllows configuration of the MySQL server version. It also allows the editing and validation of the configuration file path, and validation of the server instance section. Click to continue.
- Specify CommandsOptionally set the commands required to start, stop, and check the status of the running MySQL server instance. Commands can be customized, if required, but the defaults are suitable in most cases. The defaults depend on the selected options on the Operating System page of the wizard. Click to continue.
- Complete SetupName the MySQL server instance on the final step. This name is used throughout MySQL Workbench as a reference to this MySQL connection. After setting a suitable name, click to save the instance...
The Password Storage Vault:-
The vault provides a convenient secure storage for passwords used to access MySQL servers. By using the vault, you need not enter credentials every time MySQL Workbench attempts to connect to a server.
Note
The hostname is used for storing password information. For example, a local connection might use "localhost", "127.0.0.1", or "::1", but these are stored separately in the password storage vault, even if they all resolve to the same place.
The vault is implemented differently on each platform:
-
Windows: The vault is an encrypted file in the MySQL Workbench
datadirectory. This is where connections.xml and related files are located. The file is encrypted using a Windows API which performs the encryption based on the current user, so only the current user can decrypt it. As a result it is not possible to decrypt the file on any other computer. It is possible to delete the file, in which case all stored passwords are lost, but MySQL Workbench will otherwise perform as expected. You then must re-enter passwords as required.
-
macOS: The vault is implemented using the Secure Keychain. The keychain contents is also viewable from the native
Keychain Access.app utility.
-
Linux: The vault works by storing passwords using the
gnome-keyringdaemon, which must be running for password persistence to work. The daemon is automatically started in GNOME desktops, but normally is not in KDE and others. The gnome-keyring daemon stores passwords for MySQL Workbench on non-GNOME platforms, but it must be started manually...
Note
The hostname is used for storing password information. For example, a local connection might use "localhost", "127.0.0.1", or "::1", but these are stored separately in the password storage vault, even if they all resolve to the same place.
- Windows: The vault is an encrypted file in the MySQL Workbench
datadirectory. This is whereconnections.xmland related files are located. The file is encrypted using a Windows API which performs the encryption based on the current user, so only the current user can decrypt it. As a result it is not possible to decrypt the file on any other computer. It is possible to delete the file, in which case all stored passwords are lost, but MySQL Workbench will otherwise perform as expected. You then must re-enter passwords as required. - macOS: The vault is implemented using the Secure Keychain. The keychain contents is also viewable from the native
Keychain Access.apputility. - Linux: The vault works by storing passwords using the
gnome-keyringdaemon, which must be running for password persistence to work. The daemon is automatically started in GNOME desktops, but normally is not in KDE and others. Thegnome-keyringdaemon stores passwords for MySQL Workbench on non-GNOME platforms, but it must be started manually...
Updating Old Authentication Protocol Passwords:-
MySQL 4.1 extended password hashes from 16 to 41 bytes. However, upgrading MySQL does not automatically update the old password passwords, so existing passwords continue to be stored in the deprecated format. This is because MySQL does not store passwords as plain text, so regenerating password hashes requires user intervention.
The associated
secure_auth option was enabled by default as of MySQL 5.6. It is always enabled as of MySQL 5.7, meaning it can not be disabled. A future MySQL release will remove this option. With this option enabled, a user with a password defined in the old format will not be able to login to MySQL.
With all that said, the deprecated password format does not function with MySQL 5.7. All passwords using the old format must be updated. This section documents how to upgrade these passwords using MySQL Workbench. For information about migrating away from the old password format using the MySQL command line instead of Workbench, see Migrating Away from Pre-4.1 Password Hashing and the mysql_old_password Plugin.
Note
The method that MySQL stores a password is defined by an authentication plugin. The old method uses the
mysql_old_password authentication plugin, and the current default method uses mysql_native_password. As of MySQL 5.6, a sha256_password option is also available although it requires an SSL or encrypted connection. When Workbench upgrades passwords, it upgrades mysql_old_password tomysql_native_password. For additional information about authentication plugins, see Pluggable Authentication.Options Depend on your secure_auth Option
Upgrading a password does have constraints. Here are two scenarios:
- If the
secure_authMySQL Server option is disabled, then you can log in using the user with the old password format and update the user's own MySQL password. However, this is not an option as of MySQL Workbench 6.3.5 because compatibility with the old password format was removed. For this reason, a user's ability to upgrade their own password format must be done using the MySQL command line as described in Migrating Away from Pre-4.1 Password Hashing and the mysql_old_password Plugin.NoteIf using the MySQL command line is not an option, then you could use an older version of MySQL Workbench (version 6.3.4 and earlier), which allows you to enable aUse the old authentication protocol option under theAdvanced connections tab. Older versions of Workbench are available athttps://downloads.mysql.com/archives/workbench/.As stated earlier,secure_authis enabled by default as of MySQL 5.6, and always enabled as of MySQL 5.7. - If
secure_authis enabled, you can not log in if your user's password is stored in the old format. Attempts will fail and emit an error similar to "ERROR 2049 (HY000): Connection using old (pre-4.1.1) authentication protocol refused (client option 'secure_auth' enabled)". To upgrade the password, you can either disablesecure_auth(not recommended) then update as described above, or log in as a different and privileged user, such as root, to change the password for a different user.
Using Workbench to Upgrade Your Password
Keeping the above in mind, there are two methods to update passwords using Workbench.
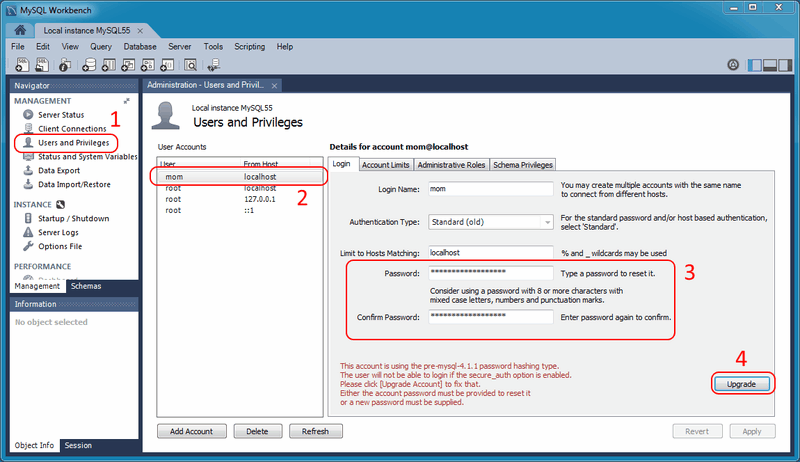
Open the Users and Privileges tab from Workbench's Management navigator. Select the user you want to update from the User Accounts section. If using the old password format, you will see text beginning with "This account is using the pre-mysql-4.1.1 password hashing type." in the lower right corner of the screen, and also a large button on the right. From here, you can:
- Option for all MySQL versions:Manually enter a new password, or the current password, and click . This upgrades the password to the newer password format, and the MySQL user can now log in using the new password that you defined.
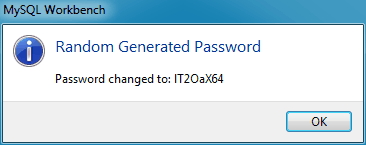
- Option for MySQL 5.6 and later:Rather than editing the password field, leave it alone and immediately click . From here, you can generate a random password and tag it as expired by clicking . Use this temporary random password to login the user, and MySQL will prompt for a new password when the user first logs in.
The following figures demonstrate the sequence of steps used in both methods:
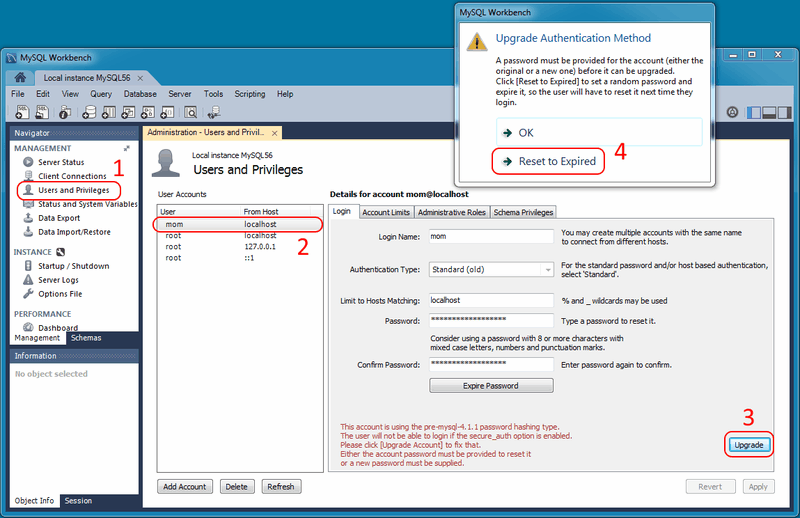
When resetting to a random password, you must save the password and give it to the user. You will find the random password in the new popup window that is similar to the following figure.
After completing the upgrade, notice the new Authentication Type for the connection. In the example shown in the next figure, the value changed fromStandard (old) to Standard. In other words, the authentication type changed from
mysql_old_password to mysql_native_password.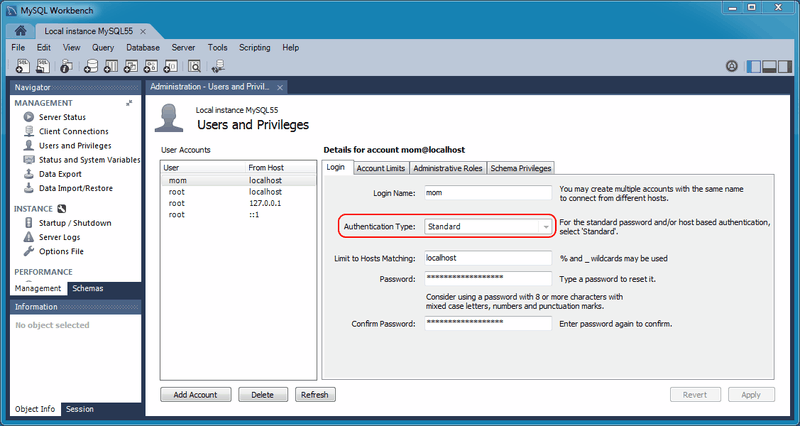
Regard's
Muhammad Waseem Mayo
+923007396305
Regard's
Muhammad Waseem Mayo
+923007396305
Muhammad Waseem Mayo
+923007396305


Comments
Post a Comment