YFI Hotspot Manager on Fedora 18 / 19 and Centos 6.4
Ok. Back to my experiment. I have spent many days to set up YFI Hotspot Manager, using Fedora 18 64bit, Fedora 19 64bit and Centos 6.4 64bit. If you are using 32 bit, it should be no problem. I didn’t use Ubuntu, because it’s often used. I do not want to be called just copy the post. Although this post reference to posts that already exist.
As usually, I assume a computer already installed, one of these operating systems, Fedora 18 / 19 or Centos 6.4, with a minimum packet. After configuration ethernet, and internet is ok, then continue to the next step.
Start with installation the file / package necessary. I didn't install all the file / package, so as not to burden the server.
yum update.
yum install wget mc vim unzip zip gcc gcc-c++ make git svn nano tar patch mod_ssl dnsmasq net-tools
Then install the main files (php mysql httpd / apache) to build a server,
yum install mysql-server php httpd php-mysql php-xml php-gd php-pear php-pdo php-devel php-common ImageMagick
Setup the firewall
For firewall, I just need iptables. In Fedora 18 / 19, before using iptables, first stop or turn off and disable firewalld.
systemctl stop firewalld
systemctl disable firewalld
and then continue to install iptables and system config firewall
yum install iptables-services iptables-utils system-config-firewall-tui system-config-firewall
configure the firewall so that some services (eg http service) can be accessed from other computers.
system-config-firewall
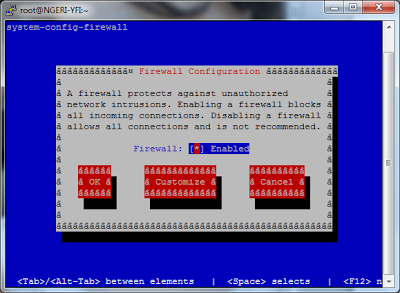
system-config-firewall wizard will appear. Then select customize, with press tab. Then press enter.
Next, in trusted services section, select some service that to be accessed. For example www (http) and ssh.
Next, select close, then press enter. Automatically, file /etc/sysconfig/iptables will created. If you want to change service port (trusted services), edit the file (vim /etc/sysconfig/iptables).
Enable service, to be run automatically at startup.
In fedora 18 / 19
systemctl enable iptables
systemctl enable mysqld
systemctl enable httpd
systemctl enable dnsmasq
In centos 6.4
[root@localhost ~]# chkconfig --level 235 mysqld on
[root@localhost ~]# chkconfig --level 235 httpd on
[root@localhost ~]# chkconfig --level 235 postfix off
[root@localhost ~]# chkconfig --level 235 dnsmasq on
[root@localhost ~]# chkconfig --level 235 ip6tables off
Edit httpd.conf
Edit file /etc/httpd/conf/httpd.conf, and in the end of line, add some line configuration below.
## -- YFi begin
<Directory /var/www/html/c2>
AllowOverride All
</Directory>
#-------COMPRESS CONTENT-----------
# place filter 'DEFLATE' on all outgoing content
SetOutputFilter DEFLATE
# exclude uncompressible content via file type
SetEnvIfNoCase Request_URI \.(?:exe|t?gz|jpg|png|pdf|zip|bz2|sit|rar)$ no-gzip
#dont-vary
# Keep a log of compression ratio on each request
DeflateFilterNote Input instream
DeflateFilterNote Output outstream
DeflateFilterNote Ratio ratio
LogFormat '"%r" %{outstream}n/%{instream}n (%{ratio}n%%)' deflate
CustomLog /var/log/httpd/deflate.log deflate
# Properly handle old browsers that do not support compression
BrowserMatch ^Mozilla/4 gzip-only-text/html
BrowserMatch ^Mozilla/4\.0[678] no-gzip
BrowserMatch \bMSIE !no-gzip !gzip-only-text/html
#----------------------------------
#------ADD EXPIRY DATE-------------
<FilesMatch "\.(ico|pdf|flv|jpg|jpeg|png|gif|js|css|swf)$">
Header set Expires "Thu, 15 Apr 2012 20:00:00 GMT"
</FilesMatch>
#----------------------------------
#--------Remove ETags --------------------
FileETag none
#-----------------------------------------
## -- YFi end
Ensure the following modules are enabled in Apache (the /etc/httpd/conf/httpd.conf file)
LoadModule rewrite_module modules/mod_rewrite.so
LoadModule deflate_module modules/mod_deflate.so
LoadModule headers_module modules/mod_headers.so
Edit /etc/php.ini
mcedit /etc/php.ini
short_open_tag = On
date.timezone = Asia / Jakarta --->Change this to your timezone
Then restart service web/apache
service httpd restart
Download cakephp, yfi_cake and yfi viewer.
Download cakephp and install
wget https://github.com/cakephp/cakephp/archive/1.2.12.tar.gz
mv 1.2.12.tar.gz /var/www/html/
cd /var/www/html/
tar zxvf 1.2.12.tar.gz
ln -s /var/www/html/cakephp-1.2.12 /var/www/html/c2
ln -s /var/www/html/cakephp-1.2.12 /var/www/c2
Next. Download yfi_cake. Remember this. If you are using PHP 5.3, use version 5 yfi cake. If you are using php 5.4 or latest, use the svn version yfi_cake. In this experiment, php version is 5.4.16, so use yfi_cake svn version.
cd /usr/local
mkdir yfi_svn
cd yfi_svn
svn checkout svn://svn.code.sf.net/p/hotcakes/code/trunk/yfi yfi
svn checkout svn://svn.code.sf.net/p/hotcakes/code/trunk/yfi_cake yfi_cake
mv yfi_cake /var/www/c2/
mv yfi /var/www/html/
chown -R apache. /var/www/html/c2/yfi_cake/tmp
chown -R apache. /var/www/html/c2/yfi_cake/webroot/img/graphics
Create database.
Just for make sure, mysql running.
service mysqld restart
For security, make password for root user.
mysqladmin -u root password yourpasswordmysql
Then create database for yfi hotspot manager.
mysql -u root -p
create database yfi;
GRANT ALL PRIVILEGES ON yfi.* to 'yfi'@'127.0.0.1' IDENTIFIED BY 'yfi';
GRANT ALL PRIVILEGES ON yfi.* to 'yfi'@'localhost' IDENTIFIED BY 'yfi';
exit;
Dump the sample database in yfi database.
mysql -u root -p yfi < /var/www/html/c2/yfi_cake/setup/db/yfi.sql
You can see the database that you have created in the folder /var/lib/mysql
At last, edit /etc/selinux/config
mcedit /etc/selinux/config
SELINUX=disabled
reboot, and let's hope everything goes well…
Test yfi_cake and yfi viewer from browser
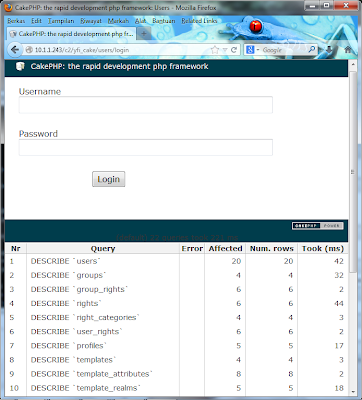
Open browser, and go to http://<your-ip-address>/c2/yfi_cake/users/
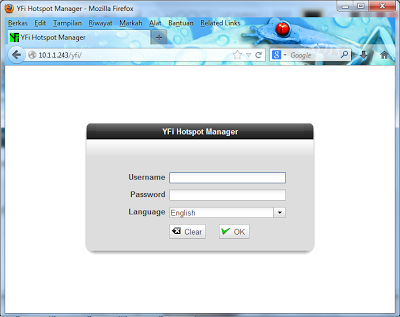
Continue testing the viewer component of yfi. Go to http://<your-ip-address>/yfi.
Try to enter using username and password below.
Role
|
Username
|
Password
|
Administrator
|
root
|
admin
|
Access Provider
|
ap
|
ap
|
Permanent User
|
dvdwalt@ri
|
dvdwalt@ri
|
If everything is ok, continue to next steps.
If you find error when you install yfi hotspot manager, look at How to Fix Problems in Installing "YFI Hotspot Manager" in this blog. may be you will find the error same is like yours, and you can fix it easily.
Configuring Freeradius
Don’t install default freeradius from command yum, because it’s never successful. I don’t know why. If you have the new information about this, please comment.
So, download freeradius 2.2.0, from http://freeradius.org. Before compile freeradius, install file / package necessary.
yum install libtool-ltdl-devel mysql-devel perl-XML-Simple perl-XML-LibXML perl-suidperl perl-libxml-perl perl-ExtUtils-Embed perl-Time-HiRes
cd /usr/local/
wget ftp://ftp.freeradius.org/pub/freeradius/freeradius-server-2.2.0.tar.gz
tar zxvf freeradius-server-2.2.0.tar.gz
cd freeradius-server-2.2.0
./configure; make; make install
ldconfig
Setup FreeRadius for working together with YFI Hotspot Manager.
cd /usr/local/etc/
mv raddb/ raddb.orig
cp /var/www/html/c2/yfi_cake/setup/radius/raddb.tar.gz /usr/local/etc/
tar -xzvf raddb.tar.gz
To start automatically, when start-up. Do this command below.
cp /usr/local/sbin/rc.radiusd /etc/init.d/radiusd
When you running command “chkconfig --add radiusd”, you will get error “service radiusd does not support chkconfig”.
How to fix it. Edit file /etc/init.d/radiusd, and in the top section of file, add some line command below, . So it will be like this.
How to fix it. Edit file /etc/init.d/radiusd, and in the top section of file, add some line command below, . So it will be like this.
#!bin/sh
# chkconfig: 2345 80 30
# description: FreeRadius 2.2.0
# processname: radiusd
# pidfile: $rundir/radiusd.pid
Then running command chkconfig to add radiusd service. It should be work well.
chkconfig --add radiusd
chkconfig --level 235 radiusd on
Next. Because I use svn, edit /usr/local/etc/raddb/sites-enabled/default
mcedit /usr/local/etc/raddb/sites-enabled/default
Find authorize { section, and comment perl and sql (perl and sql, usually at below “update control”), so it wil be like this.
update control {
Auth-Type := perl
}
#perl
#sql
Debug the freeradius, with command radiusd -X.
If everything is normal, the results is like below,
... adding new socket proxy address * port 41799
Listening on authentication address * port 1812
Listening on accounting address * port 1813
Listening on command file /usr/local/var/run/radiusd/radiusd.sock
Listening on proxy address * port 1814
Ready to process requests.
Press Ctrl + C, to stop. Continue to the next steps.
Setup pptpd to work with YFi Hotspot Manager
yum install ppp
Go to http://poptop.sourceforge.net/yum/stable/packages/. Look at the file list, select and download according to the linux operating system that you are using.
For Fedora 18 / 19, 32bit
rpm -Uvh http://poptop.sourceforge.net/yum/stable/packages/pptpd-1.3.4-2.fc19.i686.rpm
For Fedora 18 / 19, 64bit:
rpm -Uvh http://poptop.sourceforge.net/yum/stable/packages/pptpd-1.3.4-2.fc19.x86_64.rpm
For Centos 6.4, 32bit
rpm -Uvh http://poptop.sourceforge.net/yum/stable/packages/pptpd-1.3.4-2.el6.i686.rpm
For Centos 6.4, 64bit
rpm -Uvh http://poptop.sourceforge.net/yum/stable/packages/pptpd-1.3.4-2.el6.x86_64.rpm
Edit the pptpd config file ( vim /etc/pptpd.conf) at the end line, add:
localip 10.20.30.1
Make the chap-secret file be writable. So the client (apache) can access the file.
chown root.apache /etc/ppp/chap-secrets
chmod 664 /etc/ppp/chap-secrets
At last, make pptpd service will be running automatically when startup.
chkconfig --level 235 pptpd on
service pptpd restart
Cron Script
cp /var/www/html/c2/yfi_cake/setup/cron/yfi /etc/cron.d/
Then edit /etc/cron.d/yfi. Find user www-data, and change to be user apache. Then save it. So it will be like this.
*/5 * * * * apache /var/www/c2/cake/console/cake -app /var/www/c2/yfi_cake nasmonitor >> /dev/null 2>&1
*/5 * * * * apache /var/www/c2/cake/console/cake -app /var/www/c2/yfi_cake voucher_cleanup -check_for_used >> /dev/null 2>&1
0 */3 * * * apache /var/www/c2/cake/console/cake -app /var/www/c2/yfi_cake voucher_cleanup -check_for_depleted >> /dev/null 2>&1
*/5 * * * * root /var/www/c2/cake/console/cake -app /var/www/c2/yfi_cake restart_checker >> /dev/null 2>&1
*/5 * * * * apache /var/www/c2/cake/console/cake -app /var/www/c2/yfi_cake notify_checker >> /dev/null 2>&1
1 0 * * * apache /var/www/c2/cake/console/cake -app /var/www/c2/yfi_cake month_end -start >> /dev/null 2>&1
50 23 * * * apache /var/www/c2/cake/console/cake -app /var/www/c2/yfi_cake month_end -end >> /dev/null 2>&1
#This is a Work In Progress
#*/5 * * * * apache /var/www/c2/cake/console/cake -app /var/www/c2/yfi_cake client_check >> /dev/null 2>&1
#0 */6 * * * apache /var/www/c2/cake/console/cake -app /var/www/c2/yfi_cake rogue_check >> /dev/null 2>&1
#We can auto clean-up stale entries after the amount of seconds specified in the configuration file:
*/5 * * * * apache /var/www/c2/cake/console/cake -app /var/www/c2/yfi_cake stale_session_cleanup >> /dev/null 2>&1
If you find error when you install yfi hotspot manager, look at How to Fix Problems in Installing "YFI Hotspot Manager" in this blog. may be you will find the error same is like yours, and you can fix it easily.
Captive Portal / Page Login
For this section, I think I do not need to explain anymore. Because in this blog, I have been posting. But if someone asks me to explain again, I'll post again for portions captive portal. Ok. At this point, yfi hotspot manager as a hotspot billing system is complete and ready for use.


Comments
Post a Comment