General IT Related
Mikrotik Central VPN Server For Remote Branches Connectivity
Consider following scenario:
An ISP have multiple locations all over the country. Main Mikrotik router at NOC have fixed public IP. Radius Billing system is connected with LAN. All remote locations have Mikrotik Router boards as NAS and have dynamic public IP. All locations have there own internet connectivity with various ISP’s but we want to use our main RADIUS server as a centralized billing solution for all the REMOTE locations. So this is a short guide on howto create central Radius Server and connected all remote branches/nases with it.
To be continued . . . will write soon about it , while writing guide,an issue in the network popup . . 00-(
Head Office Mikrotik Config
LAN subnet = 10.0.0.1/8WAN subnet = 1.1.1.1/29
Radius = 10.0.0.2/8
First add IP pool for VPN users, like same as LAN series but with specific series.
/ip pool
add name=PPP-Pool ranges=172.16.0.1-172.16.1.255
Now add VPN Profile
/ppp profile
set 0 change-tcp-mss=yes name=default only-one=default use-compression=default use-encryption=default use-mpls=default use-vj-compression=default
add change-tcp-mss=default dns-server=101.11.11.246 local-address=101.11.11.246 name=vpn-profile only-one=default remote-address=PPP-Pool \
use-compression=default use-encryption=default use-mpls=default use-vj-compression=default
set 2 change-tcp-mss=yes name=default-encryption only-one=default use-compression=default use-encryption=yes use-mpls=default use-vj-compression=default
Now enable VPN server
/interface pptp-server server
set authentication=mschap1,mschap2 default-profile=default-encryption enabled=yes keepalive-timeout=30 max-mru=1460 max-mtu=1460 mrru=disabled
Now add user so that we will be testing from remote location NAS.
/ppp secret
add caller-id=”" disabled=no limit-bytes-in=0 limit-bytes-out=0 name=aa password=aa profile=vpn-profile routes=”" service=any
Remote Branch Mikrotik Config
LAN subnet = 192.168.100.1/8
WAN subnet = DYNAMIC Public IP x.x.x.x
Now we want to connect remote NAS with head office VPN server so that it can use central radius server as a centralized billing system.
April 30, 2013
Howto View MYSQL encrypted password

Encrypted Password Recovery / Syed Jahanzaib
Passwords cannot be viewed as its stored in encrypted format using SHA1 algorithm.
I used the following method to retrieve the old password (without changing it)
How-to view Radius Manager Admin account password without changing old one !
Login to your Linux box using root account and execute following commands
1
2
3
| mysql -h localhost -u root -s -pYOURPASSWORDuse radius;SELECT * FROM `rm_managers`; |
TIP: You can also use PHPMYADMIN to get info via nice GUIAs showed in the image below . ., but as I am a creature living in the dark, therefore I like to use black screen to perform my functions


As you can see in above image, First column in Yellow marking are Manager Id’s stored in the DB radius. and second column marked in RED are passwords stored in encrypted format. Select & copy the encrypted password. Now goto http://crackstation.net/ (or there are other websites too that can encode hash encrypted passwords) and paste your password here and click crack hashes. and you will see your password in plain text in result window.
As showed in the image below . . .

.
How-to view Radius Manager User account password without changing old one !
Login to your Linux box using root account and execute following commands.
1
2
3
| mysql -h localhost -u root -s -pyour_passworduse radius;select * from radcheck order by UserName; |
If you want to view only specific data, use the following script.
First create script and assign it execute rights.
touch /etc/rmuserlist.sh
chmod+x /etc/rmuserlist.sh
Now edit rmuserlist.sh
nano /etc/rmuserlist.sh
and paste the following data
1
2
3
4
5
6
7
8
9
10
11
12
13
14
15
16
17
18
19
20
21
22
23
| #!/bin/bash# Syed Jahanzaib / aacable@hotmail.comLUSERNAME="$1"if [ -z "$LUSERNAME" ]; thenNAME=unspecifiedficase $NAME inunspecified)MYCMD="mysql -h localhost -u root -s -pYOURPASSWORD -t -e "$MYCMD "use radius; select * from radcheck order by UserName;"$MYCMD "use radius; select * from radreply order by UserName;";;*)MYCMD="mysql -h localhost -u root -s -pYOURPASSWORD -e "$MYCMD "use radius; select * from radcheck order by UserName;" |grep $LUSERNAME$MYCMD "use radius; select * from radreply order by UserName;" |grep $LUSERNAME;;esac |
/etc/rmuserlist.shit will show you all user list.To view particular user password, simply type its name like
/etc/rmuserlist.sh testingRegard’s

Waseem Anjum Meo
December 31, 2012
2012 in review [My Blog Report by WP]
The WordPress.com stats helper monkeys prepared a 2012 annual report for this blog.

Here’s an excerpt:
About 55,000 tourists visit Liechtenstein every year. This blog was viewed about 850,000 times in 2012. If it were Liechtenstein, it would take about 15 years for that many people to see it. Your blog had more visits than a small country in Europe!Click here to see the complete report.
December 10, 2012
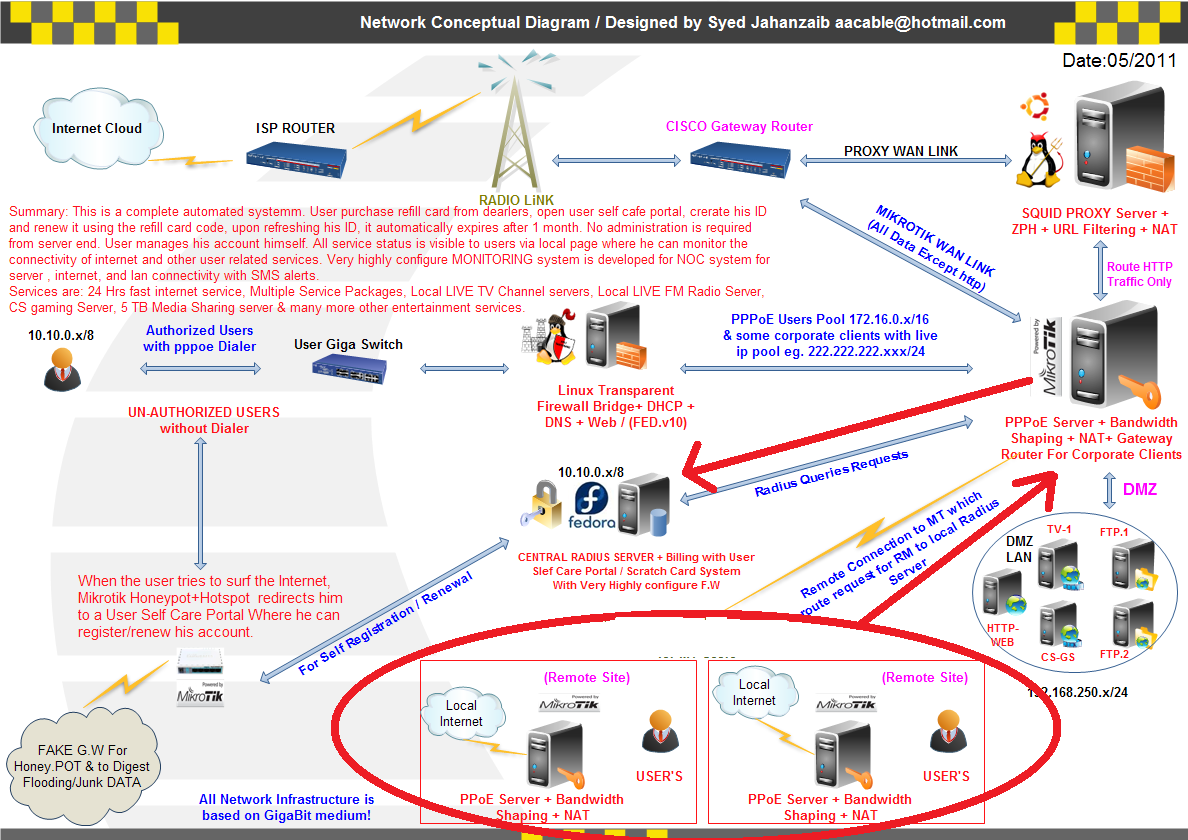
Vritualization: 3 in 1 > Using Mikrotik + Squid Proxy + Radius on single machine to save resources :)

Its a good idea to virtualize various servers so underutilized hardware can be used more efficiently, as now a days, getting good hardware is not a big deal. It can save considerable amount of power consumption , reduced heat factor , easy to mange multiple VM using various tools like Vcenter / VEEAM (my favorite), VM Explorer , live migrations from one Virtual Server to Another, Backup & Restore becomes very easy and the list goes on . . .
Recently I did an installation of a network where they were low in hardware resources but still they wanted to utilize the benefits of Mikrotik Router OS with external Squid proxy server and also the Radius Billing Server . So in total they required at least 3 physical machines, but I managed to install all of them on single server using Virtualization technology of VMWARE ESXi 5.x (64bit) and it worked so great
Here is how I did it.
Note: Because of some time shortage, I am just giving you an idea how it can be done, I am not writing in pin point details on how to connect every machine with Virtual/Physical switches. I will write about it soon.
Hardware Used for the Example:
IBM Xseries 3650 XEON Dual Processors with Quad Cores p/p3.5″ 15krpm SCSI in RAID 10 mode (300GB x 6) (the more Faster drives (like 10-15krpm) you have, the better result you will be able to achieve. Preferably in RAID mode, either 10 or 0, depend on your management and goals, in this example I used 15krpm SCSI HDD’s with dedicated RAID controller. I tested it on IBM xseries with RAID0 and found RAID 0 much more faster with 15krpm but its not redundant, one drive fail and your whole RAID will go down, so if you want redundancy, go with at least RAID 5 or RAID 10 (Recommended) , Raid 1 is also good as it mirrors each drive, but requires additional drives and also for proxy, its useless to use mirroring as it would be requiring more read/write burden on controller, oh GOD, in which argument I got into :p)
16GB RAM (Mikrotik doesn’t requires much RAM in fact it officially supports maximum of 2G, but Radius and Squid do requires some good amount of RAM, I dedicated 8 GB to SQUID, 4GB to Radius, 1 GB to Mikrotik)
4 Network Adapters ( In this article, due-to time shortage, I have only mentioned howto add two network adapters for LAN and WAN link using virtual Switch tech, but you can add more as per your requirements)
Software Used:
1) Vmware ESXi 5.x 64bit as a Virtual Hyper-visor ServerGuest OS installed in this virtual server’s are as following
2) Mikrotik Router-OS 5.22 [1GB Ram +100GB virtual HDD assigned to this VM]
3) Ubuntu 10.4 for SQUID Proxy (2.7) [8GB Ram +500GB virtual HDD assigned to this VM]
4) Ubuntu 10.4 for Radius Manager Billing System [4GB Ram +200GB virtual HDDassigned to this VM]
TIP: You can use the following RAID calculator to evaluate how much space you will be getting various RAID modes.
First install Vmware ESXi. You can get its free edition from http://www.vmware.com , just register and download the latest version , it would be in .iso format, Simply burn it to CD, and install it on your server , its very simple to install the ESXi, nothing more then just clicking NEXT NEXT
After ESXi installed, configure IP address on it, so you can manage it using its client called Vsphere client.
To shorten the story I am using only two interfaces for the mikrotik, LAN and WAN. in this example (shorten version) ESXi have two interfaces connected , one with the LAN user switch and other interface connected with the WAN (physically)
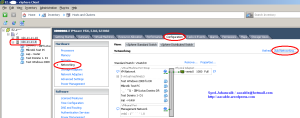
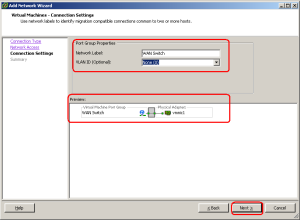
Creating Virtual Switch and bind Network Adapters with this switch.
Goto Configuration tabFrom the list appear in Hardware section, click on Networking and click on ADD Networking
As showed in the image below , , ,

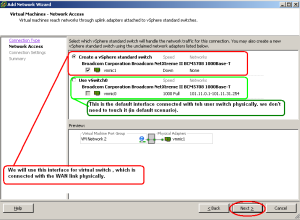
Ok, our virtual switch is created.
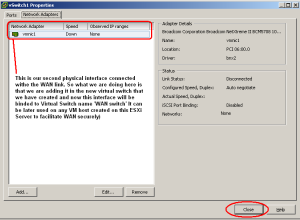
Now its time to bind our WAN adapter in this switch. (So it can later be used for WAN for all hosts we will requiring for)
Click on the Properties

Done.
Creating Mikrotik in VM and assigning network adapters.
Now create new Virtual Machine for your Mikrotik.Select necessary hardware that you required as required per user load. for example
Mikrotik = 1 CPU / 1 GB RAM / 10 GB HDD /
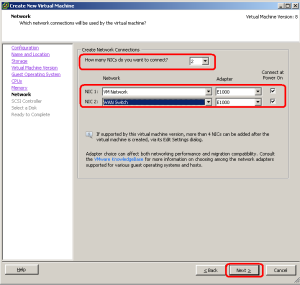
In Network Adapter Section, by default only one adapter is added, You have to add another adapter by selecting the number of adapters in drop down listing.
As showed in the image below . . .
Once the configuration is completed. Simply install the Mikrotik in newly created hosts you just created in above steps.
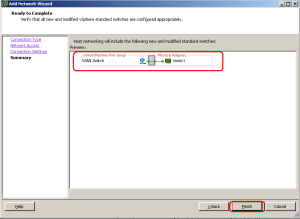
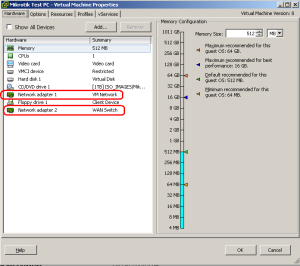
After configuration is complete, review once again the host settings,
As showed in the image below . . .
After the installation is done, Connect to mikrotik with WINBOX and look for interfaces
As showed in the image below . . .
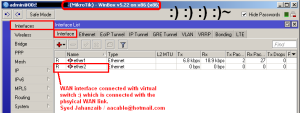
.
I will write more on it later.
Regard’s
Waseem Anjum Meo
November 22, 2012
Howto Block Adult websites using OPENDNS for free :)
Last day someone asked me howto block Adult websites in mikrotik. There is no builtin way to do it as it involves URL filtering and its not the job of ROUTER to do such task. Dedicated proxy server can do it effectively since they are built for such purposes like caching/URL filtering/redirecting etc.
We are using Microsoft TMG in our organization which filters URL based on category, so its easier for us to just select the required category that we want to block , for example Porn / Gambling / Spywares etc but Microsoft charge for this service on annual basis (Which I guess is about 15$ per user annually) , It does the job perfectly and very efficiently but its not a cost effective solution specially if you dont have much budget to pay Microsoft.
However following is the free, neat and clean method to block about 80-90% of porn web sites using OpenDNS server as your primary DNS server in your router/proxy or even desktop PC.
Use the below DNS server as your primary dns server in mikrotik / isa server / router or even a desktop. If you are using Mikrotik or other Server, make sure clients are using your server ip as there DNS server, because opendns will work only if the client / router is using there dns server. You can also force users to use your DNS server by adding redirect rule so every request for dns should be redirected to your local server.
If you are using mikrotik server, then it would look alike something below image . . .208.67.222.123
208.67.220.123

Now if you will try to open any adult web site , it wont open and will give you the default browser ‘Could not open’ error, or the request will will be redirected to OpenDNS block page informing you that your request was blocked by OpenDNS.
As showed in the image below . . .

.
You can also show your own page explaining that Adult web sites are blocked and with your Advertisement. For this purpose, you have to enable web.proxy and redirect user traffic to local proxy, then in proxy access, block the http://www.blocked-website.com and redirect it to local web server page.
↓
↓
Howto Enable Web Proxy in Mikrotik and redirect opendns error page to local error page.
↓
1
2
3
4
5
6
7
8
9
10
| /ip proxy set always-from-cache=no cache-administrator=webmaster cache-hit-dscp=4 \ cache-on-disk=no enabled=yes max-cache-size=none max-client-connections=\ 600 max-fresh-time=3d max-server-connections=600 parent-proxy=0.0.0.0 \ parent-proxy-port=0 port=8080 serialize-connections=no src-address=\ 0.0.0.0 /ip proxy access add action=deny disabled=no dst-host=www.blocked-website.com dst-port="" \ redirect-to=101.11.11.240/nonpayment/nonpayment.htm |
Now enable NAT rule to redirect user traffic to local proxy.
Now Redirect All User Traffic to Local Proxy
1
2
3
| /ip firewall nat add action=redirect chain=dstnat disabled=no dst-port=80 protocol=tcp \ to-ports=8080 |
As showed in the image below . . .

If you dont want to use proxy for all request, but for only http://www.blocked-website.com , then use the below rule that will only redirect blocked-website.com traffic to local web proxy, all other traffic will go directly.
1
2
3
| /ip firewall natadd action=redirect chain=dstnat disabled=no dst-address=208.69.33.135 \dst-port=80 protocol=tcp to-ports=8080 |
As showed in the image below . . .

↓
↓
How to force users to use specific DNS Server
↓
1
2
3
| /ip firewall natadd chain=dstnat action=dst-nat to-addresses=192.168.1.1 to-ports=53 protocol=tcp dst-port=53add chain=dstnat action=dst-nat to-addresses=192.168.1.1 to-ports=53 protocol=udp dst-port=53 |
↓
Regard’s
Waseem Anjum Meo
July 31, 2012
Howto Add SNMP Service Remotely on Windows 7/xp
I am using Mikrotik’s the DUDE monitoring tool since many years to monitor my Company’s Server’s and devices health, Recently I decided to add users subnet also on the server’s sub map to view online/offline users, there CPU / Memory/ HDD usage, personnel printers health and tons of other info.
As we all knows that for this purpose SNMP service is required on the target Windows OS. The problem was that there were over 120 nodes and I didn’t wanted to visit them each physically or didn’t wanted to take there remote to install SNMP due to some permission issues. After some googling I found one way to install SNMP service right from my admin pc by doing some fine tuning and tweaks of various commands using pstools. It’s not neat and clean , also it requires some manual work to do, but it does the job. Once you get used to it, you will find it relatively easy to deploy snmp using various method, Either its dos base batch file (that I personally use) , OR its VBS file, or running it via GPO or any other method. ! Every method works for sure.
[Remember in this example , I am using this technique in Active directory domain environment, and using domain administrator account to login to my admin pc windows, ]
First download pstools utility from following location
http://download.sysinternals.com/files/PSTools.zip
Extract it any any folder, e.g
c:\pstools
Now open command prompt , and navigate to pstools directory , e.g
cd \pstools
Adding SNMP Service remotely on Windows 7
Use the below command to initiate snmp service installation on remote windows 7 client pc.
1
| PsExec.exe \\syedjz -s -i -d ocsetup.exe SNMP |
You can use the following batch file to create public string on the client pc , right from your desktop.
First create a batch file name change_snmp_String.bat , open notepad , and paste the following text.
1
2
3
4
5
6
7
| @echo off cls reg add "HKEY_LOCAL_MACHINE\SYSTEM\CurrentControlSet\services\SNMP\Parameters" /v EnableAuthenticationTraps /t REG_DWORD /d 0 /f reg add "HKEY_LOCAL_MACHINE\SYSTEM\CurrentControlSet\services\SNMP\Parameters\PermittedManagers" /v 1 /t REG_SZ /d 10.1.1.1 /f reg add "HKEY_LOCAL_MACHINE\SYSTEM\CurrentControlSet\services\SNMP\Parameters\PermittedManagers" /v 2 /t REG_SZ /d 10.1.1.2 /f reg add "HKEY_LOCAL_MACHINE\SYSTEM\CurrentControlSet\services\SNMP\Parameters\ValidCommunities" /v public /t REG_DWORD /d 4 /f cls |
Now save this file with the name of change_snmp_String.bat (Make sure file name ends with .bat, as notepad adds .txt extension, you have to remove it by selecting ALL FILES in file type, or rename it afterward, grrrrrrr)
Save this file in any shared folder of your system, a folder that every one can access easily , preferably file server location.
Now from command prompt and within pstools directory, use the below command to initiate above batch file so that it can change the snmp string from blank to public and allow our monitoring server IP’s to query the snmp service.
1
| PsExec.exe \\syedjz -s -i -d \\fileserver\softwares\TOOLS_RELATED\snmp\change_snmp_String.bat |
1
| PsExec.exe \\syedjz -u mydomain\administrator -p ponka cmd "/c \\fileserver\softwares\TOOLS_RELATED\snmp\change_snmp_String.bat" |
To install SNMP on local Windows 7 PC using CLI, use the below command
1
| start /w ocsetup.exe SNMP |
Adding SNMP Service remotely on Windows XP/2003
Adding snmp service on Remote Windows XP is a bit
tricky and require some manual work to do, Once you manage to get it
working, you can then wrap all command in one single file and use this
file to install SNMP service via single file by monitoring target pc
name only. Ok Let’s Start . . .Create new file name snmp.inf with the following contents
(This file will be used for ocsetup to instruct that it should install snmp service)
1
2
3
4
5
| [Components]NetOC=ON[NetOptionalComponents]SNMP=1 |
Now Copy windows CD contents to any shared folder on your file sharing server or local PC. Copy the whole CD, which will be required at the time of snmp service installation.
e.g:

Now create a registry file name winpath.reg with the following contents [This file will be used on remote xp to update the windows xp registry for XP setup source files , which will be required at the time of snmp service installation.]
Make sure you change the path defined in the below script to match your local location.
1
2
3
4
5
| Windows Registry Editor Version 5.00[HKEY_LOCAL_MACHINE\SOFTWARE\Microsoft\Windows\CurrentVersion\Setup]"SourcePath"="\\\\file-server\\zaib-XP-LIC-SP2""ServicePackSourcePath"="\\\\file-server\\zaib-XP-LIC-SP2" |
Now execute the following command Which will add the windows source path to the client windows XP registry
(You must have pstools in c:\pstools folder, as explained in windows 7 section above)
1
| PsExec.exe \\syedjz cmd "/c reg import C:\winpath.reg" |
1
| PsExec.exe \\syedjz -s -i -d sysocmgr /i:%windir%\inf\sysoc.inf /u:\\files-server\softwares\TOOLS_RELATED\snmp\snmp.inf /x /q |
Remember, I only explained the raw method of doing snmp installation on remote pc’s. There are many other fine tuned method to perform this action. You can adopt whatever you like. Following are 2 batch files that do job via batch file, so you don’t’ have to type he whole commands, just type the batch file and the target PC name,
For Windows 7 , We will use two batch file.
1- win7_snmp_install.bat
2- win7_snmp_string.bat
One that will install SNMP Service on remote win 7,
1
| PsExec.exe \\%1 -s -i -d ocsetup.exe SNMP |
1
| PsExec.exe \\%1 -s -i -d \\file-server\softwares\TOOLS_RELATED\snmp\change_snmp_String.bat |
e.g: win7_snmp_install.bat clientpcname
For Windows XP, Single Batch file will be enough
1- winXP_snmp_install.bat
1
2
3
4
5
6
7
8
9
10
11
12
| @echo offclscopy /Y "C:\snmp\winpath.reg" "\\%1\c$"echo.echo.PsExec.exe \\%1 cmd "/c reg import C:\winpath.reg"echo.echo.PsExec.exe \\%1 -s -i -d sysocmgr /i:%windir%\inf\sysoc.inf /u:\\file-server\softwares\TOOLS_RELATED\snmp\snmp.inf /x /qecho.echo.echo All Done, Hopefully. Script by Syed Jahanzaib |
e.g: winxp_snmp_install.bat clientpcname
Regard’s
Waseem Anjum Meo
July 25, 2012
Using snmptools to monitor Disk Read / Write Time [Win2008 64/32 bit]

In the past, I was using erwan‘s snmptool on windows 2003 base server’s to graph mrtg of any instance of remote pc including Windows Performance Monitor Counters, snmptools give the power to query any performance counter and taking that value, you can create nice graphs on mrtg or other monitoring system like Mikrotik base the DUDE
e.g: http://aacable.wordpress.com/2012/07/02/the-dude-show-us-your-map-series/
, but unfortunately it didn’t worked out for me on Windows 2008 64 bit base servers. When I try to query the 1.3.6.1.4.1.15.1 oid tree, I get no results, even after installing snmptools, I found at that I have to manually add the counters myself in the counters.ini file.
I did accomplish this task by using following method. Make sure you install SNMP service & configure it before continuing.
Automatic Installer is available at
The Manual method is as below . . .
Download Erwan SNMPTOOLS from
Unzip it to any folder. Copy snmptools.dll to c:\windows\ folder.
Now run regagentWow6432.reg
Restart SNMP Service.
Now query this box using snmpwalk or any other snmp browser. I usually use Linux [ubuntu] base OS for general purposes.
1
| snmpwalk -v2c -c public 10.0.0.1 1.3.6.1.4.1.15 |
SNMPv2-SMI::enterprises.15 = STRING: “snmptools by erwan.l@free.fr”Now open c:\counters.ini (If it doesn’t exists, create one) , Remove all lines and add following lines.
;this file is optionalSave & Exit.
;you can define here the hardcoded oid for specific ms counters
[1.3.6.1.4.1.15.1]
counter=PhysicalDisk\% Disk Read Time\_Total
[1.3.6.1.4.1.15.2]
counter=PhysicalDisk\% Disk Write Time\_Total
[1.3.6.1.4.1.15.3]counter=PhysicalDisk\Avg. Disk Queue Length\_Total[1.3.6.1.4.1.15.4]counter=PhysicalDisk\Avg. Disk Queue Length C:[1.3.6.1.4.1.15.5]counter=PhysicalDisk\Avg. Disk Queue Length\1 D:
Now use the following Query
For Disk Read in %and likewise.
snmpwalk -v2c -c agp 10.0.0.1 1.3.6.1.4.1.15.1
For Disk Write Time in %
snmpwalk -v2c -c agp 10.0.0.1 1.3.6.1.4.1.15.2
To show Disk Read/Write time in the DUDE device appearance , use the following code:
Disk Read / Write Time C: & D: [string_substring(oid("1.3.6.1.4.1.15.1"),0,3)] / [string_substring(oid("1.3.6.1.4.1.15.2"),0,3)]You can use same principal and hard code any OID you like, for example other performance counters.
On Windows 32 bit, simply installing http://erwan.labalec.fr/snmptools/snmptools32.exe will give you whole list under 1.3.6.1.4.1.15 oid tree.
April 16, 2012
February 11, 2012
Resignation Letter Sample

Following is an resignation letter sample. Just in case any one need it :p
To
The Director,
New Allied Electronics Industries (Pvt) Ltd.
Subject: RESIGNATION LETTER
Respected Sir,
I am currently working in New Allied Electronics as a “Network Engineer” in IT Department, currently appointed at K.D.C
Branch Office . With reference to the above noted subject, I would like
to resign from your company for some of my personnel reasons. Therefore
it is humbly requested that kindly accept my resignation and relieve me
from my duties.
My resignation is effective from today. I am providing NAEI with four weeks notice. My last working day will be 29th February, 2012
Thank you for the opportunities for
professional and personal development that you have provided me during
the last 3 years. I have enjoyed working for the company and appreciate
the support provided to me during my time with the company.
If I can be of any help during this
transition, with training or hiring please let me know as I would be
happy to make myself available.
Regard’sYours Sincerely,
Waseem Anjum Meo
Network Engineer
KDC IT DEPT.
27th January, 2012
December 17, 2011
Howto install Windows XP from USB Drive?

There are several ways to do this, For example If you have USB disk with under < 2gb Space, you can follow this VERY simple and easy to follow Guide
But unfortunately for some reasons, it didn’t worked out for me .
So I decided to go with the USB_MULTIBOOT, In this example I am using the same.
Here We Start . . .
.
1)
You will need a special tool name USB_MULTIBOOT that will copy xp cd to usb and enable the Usb to boot Windows XP setup.
You can Download it from
Unzip it to any folder. For example
c:\usb_multiboot_10
.
2)
Run USB_MultiBoot_10.cmd from your the folder.
(As Shown in the image below)

Press any key to continue.
.
3)
Format Utility will appear, Select ‘ H ‘ , It will then give you several options to choose. Select the following.
FILE SYSTEM = NTFS
FORMAT OPTIONS = QUICK
(As Shown in the image below)

TIP: Using the “HP format” option works fine for any capacity, and you can use FAT32 / NTFS
without problems. This can be useful as more systems can read FAT32 than NTFS.
.
4)
Select Option 1 > Select the WINDOWS XP Source path (CD or Extracted version)
(As Shown in the image below)

.
5)
Select Option 2 > Select USB-Drive Target Drive
(As Shown in the image below)

.
It will ask you to whether you want to install XP in Un-Attendend mode, which means that it will auto enter the required info during the setup installation like User names / Windows XP CD KEY / TimeZone etc.
Select YES and enter the required info like User Name CD Key etc. Follow the on screen instructions.
(As Shown in the image below)

.
6)
Now select option # 3 [Make MultiBoot and Copy Source] to start the setup copy process.
(As Shown in the image below)

.
After this It will start copying XP files to USB and will perform necessary actions to make it Bootable.
After All data is copied It will inform you that
” FileCopy to USB-Drive is Ready -OK- Success” ,
Click YES to continue.
(As Shown in the image below)

.
ALL DONE. Your USB – Drive is ready for Booting.
Plug it to your computer and in BIOS select USB in first boot device.
After booting from USB you will see boot menu of usb , Something Like below image.
.

.
Choose Text installation at first time
and GUI INSTALLATION AFTER REBOOT TWICE !
( Description: Choose step 1 to start installing xp in text mode, partition setup etc, After reboot choose step two, After continued install , choose step 2 AGAIN to log into XP -
As soon as you arrive at the Windows XP Desktop you can safely remove the USB Drive.
IMPORTANT! DO NOT REMOVE USB STICK UNTIL YOU’LL SEE XP’s FINAL LOGIN SCREEN!
.
http://www.msfn.org/board/topic/112627-usb-drive-target-error/
Regard’s
Waseem Anjum Meo
Mob:0333-xxxxxxxx


Looking for Solution regarding How to Fix Cannot Detect Adapter Error in Netgear Router? Netgear Router problems visit on:
ReplyDeleteNetgear Technical Support
Netgear Support
Router settings netgear
Netgear Support
Netgear router setup
Looking how to reinstall firmware on netgear router, visit on: Check this Blog