Monitor Switch Ports Up/Down Status via Mikrotik Dude – Short Notes
Monitor Switch Ports Up/Down Status via Mikrotik Dude – Short Notes


.
In my network, I have few Cisco switches at various departments connected via FIBER optics. Recently we were having issue of network connectivity in between various switches and devices. I already have a very good setup of Mikrotik base DUDE monitoring system, but it shows only the SWITCH availability status on the screen, I wanted to have a good visual for switch ports too.
I found few ways to accomplish this task using DUDE functions, scripts, etc, but found following method is very simple to start with . It also sends me email when any port goes Down or not in use.
Make sure your switch support SNMP , and SNMP agent is enabled at your SWITCH as well as at your DUDE to match the same. For simplicity you can use PUBLIC as a default community string in the switch. Also In this example I have used CISCO 3750 (in dual stack mode) and add only few ports just for example.
First add your switch in the map so that it can appear in the map as look like below.
As showed in the image below . . .
 .
..
.
Adding PROBE for port monitoring
Now to add PORTS monitoring, Open Dude,Goto PROBES and click on + sign to add new probe.
Use the following data.
Name = PORT 9
Type = SNMP
SNMP Profile = Your SNMP Profile
Oid = iso.org.dod.internet.mgmt.mib-2.interfaces.ifTable.ifEntry.ifOperStatus.10109
Oid Type = integer
Comapre method = ==equal
Integer Value = 1
As showed in the image below . . .

Note: Change the OID number to match the port number on your switch , for example I am monitoring port number9 which value is 10109 . You can use SNMPWALK via DUDE to check the OID’s for different ports of your switch.
Now click OK to save
.
.
Adding Switch PORT separately using IP and PROBE
Its time to add PORTs in your map so they can appear separately as showed in the title imageGo back to your MAP,
Right click and ADD new device,
Type your switch IP address, and click on Next,
Now DO NOT click on Discover , simply click on + sign
In PROBE, Select the PORT 9 probe you created earlier
and click on Apply/OK
As showed in the image below . . .

Click on Finish.
.
.
Now you will see something like below . . .

As you can see the port number 9 is down , so the status is shown correctly.
.
.
Now you can repeat the same procedure to add as much ports you like to monitor.
Something like below image . . .

.
.
.
Adding LINKS to monitor port usage
You can also add LINKS to show the port usage :)As showed in the example below . . .


.
.
.
After adding ports / snmp links, and other enhancements , you can see something like below image . .
.
 .
.
.
.
I will add more methods to monitor the ports. For more info , please read more at following links
.
.
.
Regard’s
Syed Jahanzaib
Syed Jahanzaib
July 1, 2013
Cisco ASA 5510 Backup to TFTP Server using ASDM
- ☺☺☺☺☺☺☺☺☺☺☺☺☺☺☺☺☺☺☺☺☺☺☺☺☺☺☺☺☺☺☺☺☺☺☺☺☺☺☺☺☺☺☺☺☺☺☺☺☺☺☺☺
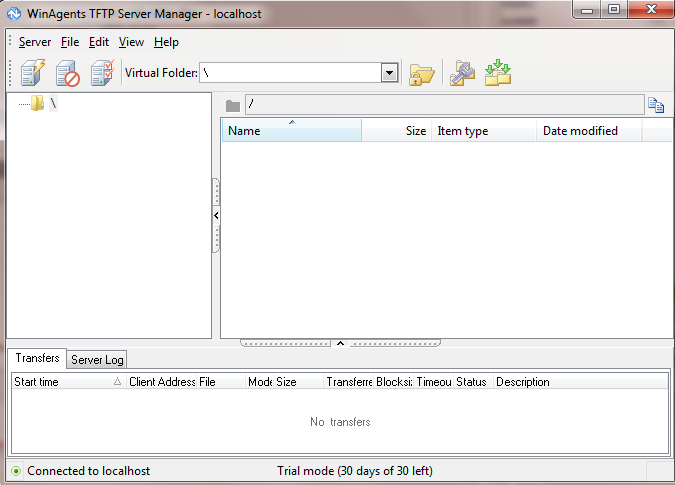
First download WINAGENTS TFTP Server application
(Its a small utility) and can be installed on any version of windows you are running. Installation is traditionally simple by clicking on Next button.
1- Install WINAGENTS TFTP SERVER
2- Start TFTP Server
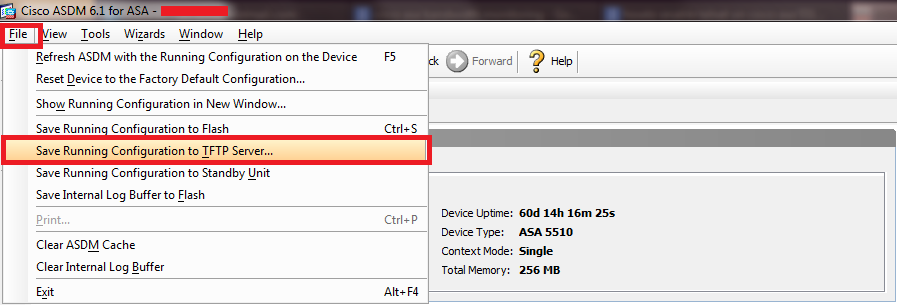
3- Login to ASA using ASDM tool
4- Goto File > Save running configuration to TFTP Server
5- Type TFTP Server IP Address (where the tftp software is installed. and in Configuration File Path, Type the File name and click on SAVE CONFIGURATION.
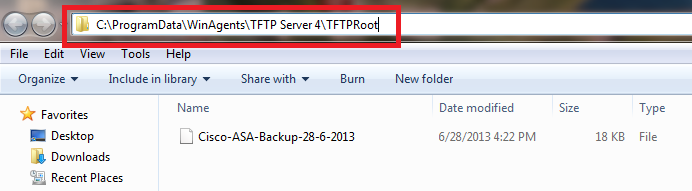
The configuration will save in few seconds. The default path of file saved is
C:\ProgramData\WinAgents\TFTP Server 4\TFTPRoot
► As showed in the images below . . .


☺♂
Regard’s
Syed Jahanzaib
December 7, 2012
Cisco 3750: Howto enable err-disabled ports
Personnel Reference Guide:

Errdisable is a feature that automatically disables a port on a Cisco Catalyst switch and is supported on most Catalyst switches running the Cisco IOS software.
The Errdisable error disable feature was designed to inform the administrator when there is a port problem or error. The reasons a catalyst switch can go into Errdisable mode and shutdown a port are many and include:
-
Duplex Mismatch
-
Loopback Error
- Link Flapping (up/down)
- Port Security Violation
- Broadcast Storms
To enable err-disabled ports on Cisco 3750 switch series. Follow the below . . .
First make telnet connection with the switch
telnet 10.0.0.1(change the ip as required,)
Enter Password to continue.
To view Disabled Ports:
show interfaces status err-disablede.g:
NOC_SWITCH>show int status err-disabledTo Enable Port:
Port Name Status Reason Err-disabled Vlans
Gi2/0/10 err-disabled link-flap
NOC_SWITCH>
enableChange the interface name to match your. In above example I had two 3750-e models in stack mode. so its showing G2, you may get G1 if you have single switch.
config t
int G2/0/10
no switchport port-security (< You probably dont need this line, its just to disable pot security feature, I used it to perform various tests)
shut
no shut
exit
TIP:
Link flap means that the specific port continuously goes up and down. The port is put into the errdisabled state if it flaps more than four-five times in few seconds. The common cause of link flap is a Layer 1 issue such as a bad cable, duplex mismatch.
For more detailed and brief descriptions, please visit
http://www.firewall.cx/cisco-technical-knowledgebase/cisco-switches/883-cisco-switches-errdisable-autorecovery.html
Regard’s
Waseem Raaj


Comments
Post a Comment