HowTo: Ubiquiti mFi mPower
Ubiquiti recently made their 3 port mFi mPower (EU plug only) available in Europe. It provides 3 plug sockets that can be controlled via WiFi using their freely downloadable mFi controller software. Setup is fairly straight forward.
In the first instance the mPower becomes an access point that you can connect your PC/Laptop or in my case my mobile phone to. The access point will have the name of mFi followed by the last 3 octets of its MAC address. There’s no encryption of password required to connect at this point.
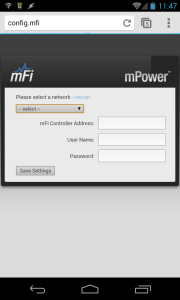
Then it’s simply a case of opening your browser and typing http://config.mfi into the address bar.
If your own WiFi network does not appear in the drop down list you can click rescan to attempt to find it. Once you’ve selected your network, and provided any login details for it, you can provide information about your controller, more correctly the PC that it’s running on.
Once again, this mFi device is running linux and this gives us a little scope for having a hack about. The areas of the file system we’re most likely to be interested in are /proc/gpio and /proc/power
To find out the state of the LED we can simply cat led_status, not only does it tell us the current status but it also tells us how to change it.
A simple echo value to the led_status will change it for us, for example
will give us an orange led. You’ll probably notice, if you haven’t started up your controller that the led will be flashing orange. That’s where the led_freq comes in.
The LED will stop flashing. If you replace the 0 (zero) with a value somewhere between 0 and 7 you’ll see the rate of flash change. Although 7 is going to look pretty much like it’s not flashing to most people.
As mentioned, /proc/power is the other area of the file system that we are interested
and straight off (no pun intended) we can find out the status or the relays
Similar to the LED status, we are being told that this relay is on. To turn it off, as expected
The physical sockets are numbered so it’s straight forward to identify which relay controls which socket. If you cat most of the other files, even with the relay on you’re going to be a little disappointed because all the values are 0.
There’s a little trick, have a look at the enabled1, enabled2 and enabled3 files,
They all say off. Even if your relay is on, these will say off. So, turn them on.
Leave it for a minute or two with something plugged in to the socket and then have a look
If you take a look at the outlet files, which appear to be a summary of the individual socket ones,
The downside of not using a controller is that you’ll need to echo 1 to each enable file for each socket at every boot. You can of course do this with ssh but you’d need to be sure the device was up. You can of course also control the relays over ssh
You might want to setup ssh with keys to make this more flexible and not prompt for a password or, if you’re not particularly bothered about security you could use expect, spawnand send. For example, here’s a little expect script to turn relay 3 on. Simply pass the ip address as the first parameter and the password as the second parameter.
1
2
3
4
5
6
7
8
9
10
11
12
13
14
15
16
17
18
19
20
21
22
23
24
25
26
27
28
29
30
|
#!/usr/bin/expect
#
# Set wait timeout
#
set timeout 5
#
# Make connection, pass ip of mPower to this script
#
spawn ssh [lindex $argv 0] -l ubnt
#
# wait for the password prompt
#
expect "password: "
#
# send password string, passed as 2nd parameter to this script.
#
send [lindex $argv 1]
send "\r"
#
#
expect "#"
#
# turn on relay 3
#
send "echo 1 > /proc/power/relay3\r"
#
# disconnect from mPower...
#
expect "#"
send "exit\r"
|
You could use a similar script, for example, to cycle the power to your adsl modem if the connection dropped.


Comments
Post a Comment