How to manually configure a Ubiquiti Rocket
This is a brief, text and image tutorial to show you exactly how Meta Mesh configures a Ubiquiti Rocket, PicoStation, or NanoStation to work on PittMesh. PittMesh currently uses OLSR as its meshing protocol. These steps are liable (and likely) to change in the future without notification.
This article also serves as the first manual documentation of how to install OLSR on OpenWRT in English on the Internet. OLSR is a protocol over twenty years old. If the mesh networking community is to grow, we must not rely solely on technologists who keep knowledge to themselves but share it via well-documented instructions. Meta Mesh looks forward to further documenting other configurations and protocols in the near future.
Assumptions: We assume you are using a computer with an Ethernet adapter, running either Windows, Linux, or OSX. The steps may vary between them slightly. We also assume the Rocket is running its stock Ubiquiti firmware. We also assume you have enough ethernet cables to plug everything in. We also assume that you have a house network handing out DHCP leases and it has Internet access. We will not be covering the TFTP flashing method in this particular tutorial. For some steps you may need to disconnect from your router and plug into your house network for Internet access.
0- For Windows, download and install:
For MAC, download and install:
1- First we need to flash the Rocket with OpenWRT. Download the OpenWRT "Barrier Breaker" firmware for the Rocket M2/M5 at https://downloads.openwrt.org/barrier_breaker/14.07/ar71xx/generic/ or directly from this link. There are two versions for the Rocket, one file ending in "factory" and the other ending in "sysupgrade." We need the "factory" image. The sysupgrade image is only used from going from one OpenWRT image to another.
2- Once you have downloaded this image, get out your Rocket. Plug it in as the picture shows, with the black PoE injector plugged in to an outlet andthe router connected via Ethernet to the "PoE" port. Plug the other Ethernet cable into the LAN port and then into your computer's Ethernet port like the image below.

4- Open a browser and enter "192.168.1.20" in the URL bar. You should see the following login page. Log in by accepting the terms, selecting your country, and using "ubnt" the username and "ubnt" as the password.

5- Now navigate to the System tab. Find the Firmware Update section and click Browse next to Upload Firmware. Locate the file you downloaded from the OpenWRT site and upload it. Confirm the upload and go wait for 5 whole earth minutes somewhere else (really it should take about 1.5 minutes but unplugging the device at this point can permanently break it. So just go away and let it cook).
6- In your browser, go to 192.168.1.1. Welcome to OpenWRT! Now click Login. You don't need to enter any username and password at first. Now that you're logged in, click "Go to password configuration."

7- Enter a password twice and DON'T HIT ENTER, rather, scroll to the bottom and click Save and Apply.

8- Go to Network > Interfaces and click Edit next to the br-lan interface. Click Save and Apply!

9- First, uncheck the "Bridge Interfaces" box. Then, select the "Ethernet Adapter: "eth0"" interfaceClick Save and Apply!

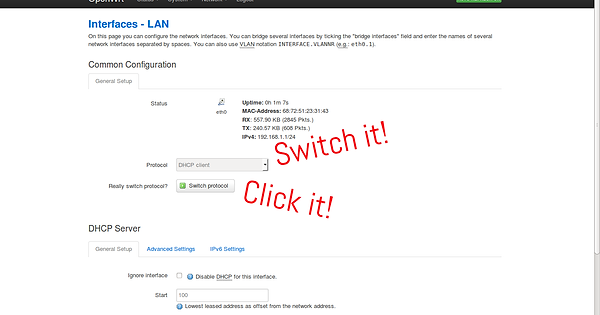
10- Go to the General Setup subtab. First, write down the MAC-Address of your device. Click Protocol and select DHCP Client. A button will appear called "Switch Protocol." Click it. DON'T forget to click it. Now click Save and Apply-- but only after you clicked Switch Protocol. If you don't, it won't switch the protocol and you'll still have the 192.168.1.1 IP address.
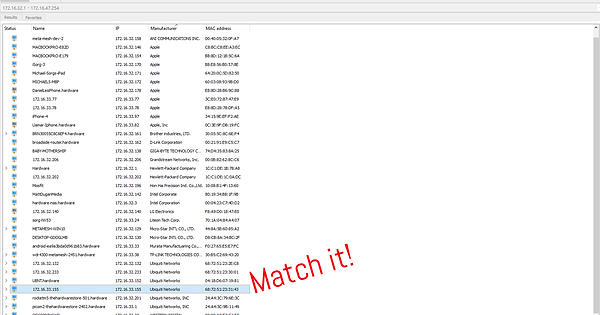
11- Your Rocket will now be asking for a new IP address from an authoritative DHCP server on its Ethernet Interface. You now need to take the Ethernet cable that's plugged into the LAN port of the PoE injector and plug it into your house network. Once you've done that- fire up either Advanced IP Scanner or LanScan and run it. Look for the device from Ubiquiti Networks with the MAC-Address that you wrote down. Now record that device's new IP address.
12- Go back to your browser and type in that new IP address. Your Rocket will be accessible at this address now. Log back in with the password you set and head back to Network > Interfaces. Delete the WAN and WAN 6 Interfaces

13- Time for some terminal work. On Windows, open up PuTTY and enter the ip address of your router in the hostname field and click Open. Click "Yes" when the PuTTY security alert comes up. If you are using an OSX computer, find "Terminal" in your applications folder, open it, and type "ssh root@x.x.x.x" and replace the x's with the router's IP Type "yes" when the security warning comes up.

14- You are now connected via SSH to your router. type in your username (root) and hit enter then your password and hit enter. You will now see the OpenWRT welcome page.

15- Now you will paste in a few commands. In PuTTY, pasting is done by copying the text you want to enter and right clicking in the black window.
First, type or paste in "opkg update" without the quotes. The router will retrieve the most recent list of packages available for OpenWRT. If you reboot the router you will need to run this command again to update the local list of packages.
Once the lowest line on the screen reads "root@OpenWRT:~#" again, paste in the following command:
opkg install luci luci-ssl pciutils luci-app-olsr luci-app-olsr-services luci-app-olsr-viz olsrd olsrd-mod-arprefresh olsrd-mod-bmf olsrd-mod-dot-draw olsrd-mod-dyn-gw olsrd-mod-dyn-gw-plain olsrd-mod-httpinfo olsrd-mod-mdns olsrd-mod-nameservice olsrd-mod-p2pd olsrd-mod-pgraph olsrd-mod-secure olsrd-mod-txtinfo olsrd-mod-watchdog olsrd-mod-quagga wireless-tools luci-lib-json kmod-ipip ethtool snmpd iptables-mod-extra iptables-mod-iface iptables-mod-iprange
Hit Enter and wait for all the packages to install. Once that has completed, paste in our last command which looks for any upgradable packages and upgrades them:
for i in `opkg list-upgradable|cut -d " " -f 1`;do opkg install $i;done
Wait for this command to complete. You will be returned to the "root@OpenWRT" prompt when it is finished.

16- Back in your browser, go to System > Startup and click the "Disabled" button next to snmpd and the "Enabled" button next to odchpd. Click Save and Apply.

17- Now it gets easier! We just need to flick some switches. Go to System > System and change your hostname.
On PittMesh, we recommend using the following format: model-location-bandnumber. So for a 2.4GHz Rocket M2 deployed at The Hardware Store and it being the first 2.4GHz device there, we would name it "rocketm2-thehardwarestore-2401". For a second 2.4GHz device, let's say a Picostation, deployed at The Hardware Store, the name would be "picostationm2-thehardwarestore-2402".
Under Time Synchronization, for PittMesh, check the "Provide NTP Server" box and in the first field enter "10.66.6.1" without the quotes. PittMesh has a time server on the mesh at the IP address 10.66.6.1. If you're not on PittMesh, don't enter this.
Click Save and Apply.

18- Go to Network > DHCP and DNS. Find the DNS Forwardings field and enter 8.8.8.8. This allows DNS requests to go to Google's DNS servers and is important when using OLSR, our meshing protocol, later on.
Click Save and Apply.

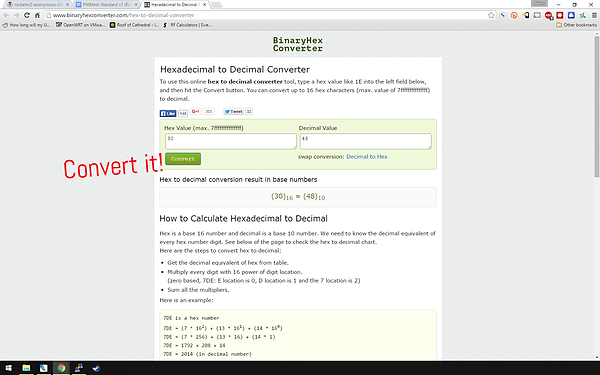
19- Remember that MAC address we wrote down? We need it now. We need to convert the last three digits from the MAC address to numbers for use in the IP addresss on the mesh. Go to http://www.binaryhexconverter.com/hex-to-decimal-converter and, one by one in order, convert the last three sets of two characters to numbers.
For example, if your MAC address was "68:72:51:23:30:A4" you would take the last three sections of the address (23:30:A4) and type each into the converter and click convert. We're converting from Hexademical to Decimal. By using MAC addresses as the basis for IP addresses, we can be reasonably sure that we won't repeat an IP address and create a confused routing table on the mesh network.
After converting our example MAC address we get the following sets of numbers: 35, 48, and 164. right these down in the order they appeared in their original form in the MAC address. 23:30:A4 = 35.48.164
IF the first number is below 64, add a 1 in front of it. our first number, 35, is below 64 so we will add a 1 in front of it. Our final three numbers will be 135.48.164. If the number is a single digit, add a one and then a zero. ONLY do this with the first number.
20- Now! Go back to Network Interfaces and click Add New Interface. On the next page, name this interface "mesh" without the quotes.
Check the radio button next to "Wireless Network: Client "OpenWRT""
Click Submit.
A new page will show up, in the IPv4 Address box, enter "100.x.x.x" where the x's are the three sets of numbers we just calculated. This will be the mesh IP address for the router. Using our example, we would enter 100.135.48.164.
In the IPv4 Netmask, select 255.0.0.0
Click Save and Apply.

21- Go back to Network > Interfaces and click "Add New Interface" again. This time, name theinterface "wlan". Again, assign the interface to the "Wireless Network" radio dial.
Click Submit.
On the second page, in IPv4 address, enter "10.x.x.1" where the x's are the LAST TWO numbers we converted. From our example they would be 48 and 164 so we would enter 10.48.164.1.
For IPv4 Netmask we will set it as 255.255.255.0
NOW BE CAREFUL! Scroll down and click SAVE only- not Save and Apply. Once you have done that...
Click the "Setup DHCP Server" button. This will present more options.
Start: enter the value 10.
Limit: enter 253
Leasetime: 1h indicating 1 hour.
Now click Advanced Settings and check the box that says "Force"
Now you may click Save and Apply.

22- Go to Network > WiFi and click "Edit" next to the SSID "OpenWRT"
Here we are going to configure the wireless settings for the mesh interface. For 2.4GHz nodes on PittMesh, the channel is always 11.
Set the ESSID to be "PittMesh-Location-bandnumber" in a similar fashion to the hostname. For our router for example, we will have "PittMesh-TheHardwareStore-2401". Naming the wireless signals this way helps prevent roaming into other unique subnets from other nodes and allows better pinpointing of slow or disconnected nodes.
The mode will remain Access Point.
The Network should ONLY be "wlan" so uncheck "lan" and "mesh"
Click Save and Apply.

23- Now go back to Network > WiFi. This time, click Add.
Like the first wireless network, this will be on channel 11. All the wireless is connected so changing channel on one network will change it on the rest.
The ESSID for this network will be "PittMesh-Backhaul" without the quotes, with the capitalization, with no spaces, and with a single "-" symbol between the words. If you misspell the ESSID your device will not mesh with other PittMesh nodes. All wireless mesh networks must have the exact same ESSID.
Change the Mode from "Access Point" to "Ad-Hoc."
Check the "mesh" Network box.
Click Save and Apply.

24- Now Go back to Network > WiFi and click ENABLE next to one of the wireless networks you created. BOTH of the wireless networks should turn on. If one doesn't, click it's enable button.
25- Head on over to Services > OLSR IPv4 > Plugins!
We need to enable a plugin that we installed earlier. It does not turn on automatically so we need to check the box next to "olsrd_jsoninfo.so.0.0 then click Save and Apply.
26- On the HNA Announcements tab, Click Add.
Take the first three octets of your wlan IP address and enter them here followed by a zero. Our example network would be 10.48.164.0 and the Netmast will be 255.255.255.0
If this router will be connected to the Internet and will act as a gateway to the Internet for anyone on PittMesh, click Add again and enter 0.0.0.0 for the Network address and 0.0.0.0 for the Netmask. Click Save and Apply!

27- Services > OLSR IPv4. Go to Link Quality Settings. Change the LQ algorithm from etx_ff to etx_ffeth. This will allow meshing over Ethernet! Click Save and Apply.
28- Scrolling down all the way you will find an Interfaces section in Network > OLSR IPv4. Click the Edit Button next to the first Interface. On the next page, change the Network from "wlan" to "mesh" and click Save and Apply.
29- Return to Services > OLSR IPv4 and scroll down to Interfaces once more. If you would like to mesh over Ethernet (expecially if you have another PittMesh router on your network, do the following: Click Add. On the next page, select the "lan" network button and change the mode to "ether."
Click Save an Apply!

30- On to the Firewall! Go to Network: Firewall.
a)
Under General Settings, change "reject" to "accept"
Delete the "wan" zone.
Check the "masquerading" box in the lan zone.
Click "Save and Apply."
b) On the same page, scroll down and click "Add" to add a new zone.
On the next page, name the zone "wlan", check the box next to the "wlan" network and check the box under Inter-Zone Forwardings next to "Allow forward from source zones". Click Save and Apply.
c) Back at the overview, Click "Add" again.
On the next page, name the zone "mesh", cover the "mesh" network and check both "wlan" boxes in Inter-Zone Forwardings and the "lan" box in "Allow forward from source zones." Click Save and Apply!

31- Last Step!
Go to Network > Firewall > Custom Rules
Paste in the following incantation to prevetn mesh users from accessing your private home network:
iptables -I FORWARD -i wlan0-1 -d 192.168.0.0/16 -j DROP
iptables -I FORWARD -i wlan0-1 -d 10.0.0.0/8 -j DROP
iptables -I FORWARD -i wlan0-1 -d 172.16.0.0/16 -j DROP
If you want to allow access to a device on your network, you should know what you're doing and you should create the appropriate iptables rule to allow traffic to that IP address.
32- Reboot the router and welcome to the PittMesh Community Wireless Network!!!
Changelog:
12/7/2015:
- Clarified step 29a by adding the line "Click "Save and Apply."
- Clarified step 29b by describing what clicking "add" does: adds new firewall zone.
- Added a graphic at the end of step 29 to show what the end result of editing the zones should look like.
- Inserted a new step (step 15) to change the rfc1918_filter option in /etc/config/uhttpd to 0 which then changed the numbering of all following steps including those referenced as 29 above.
- Changed numbering of old steps 15 - 31 to 16 -32.
10/23/2015: Changed the netmask for the mesh network interface from a /10 to a /8 but kept the instructions to ensure the router does not have a publicly routable IPv4 address in step 19.


Comments
Post a Comment